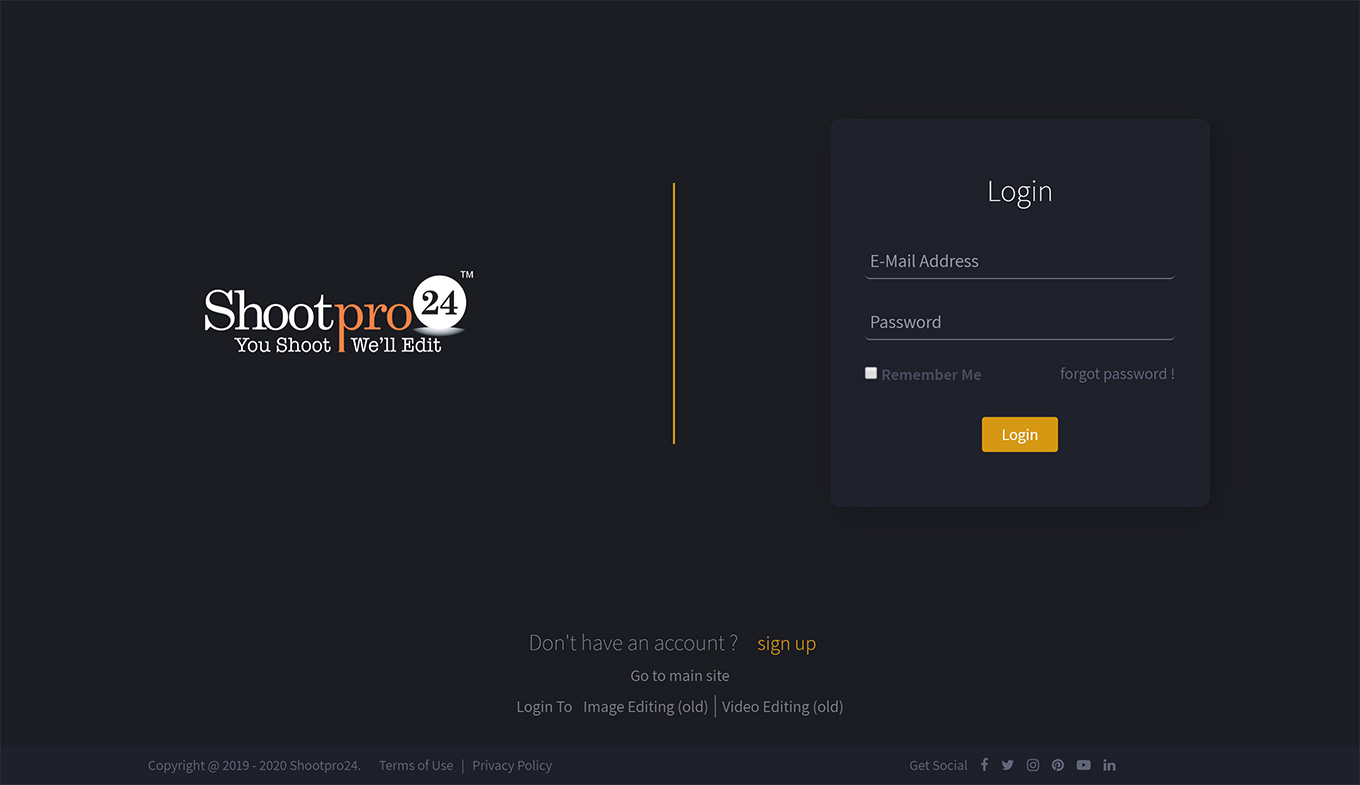
You can log in to https://v2.shootpro24.com/login with your Registered email-ID and Password. If you are a new user or haven't registered with Shootpro24 before, create a new account by clicking on "sign-up" https://v2.shootpro24.com/register on the login page.
If you’re a new registration:
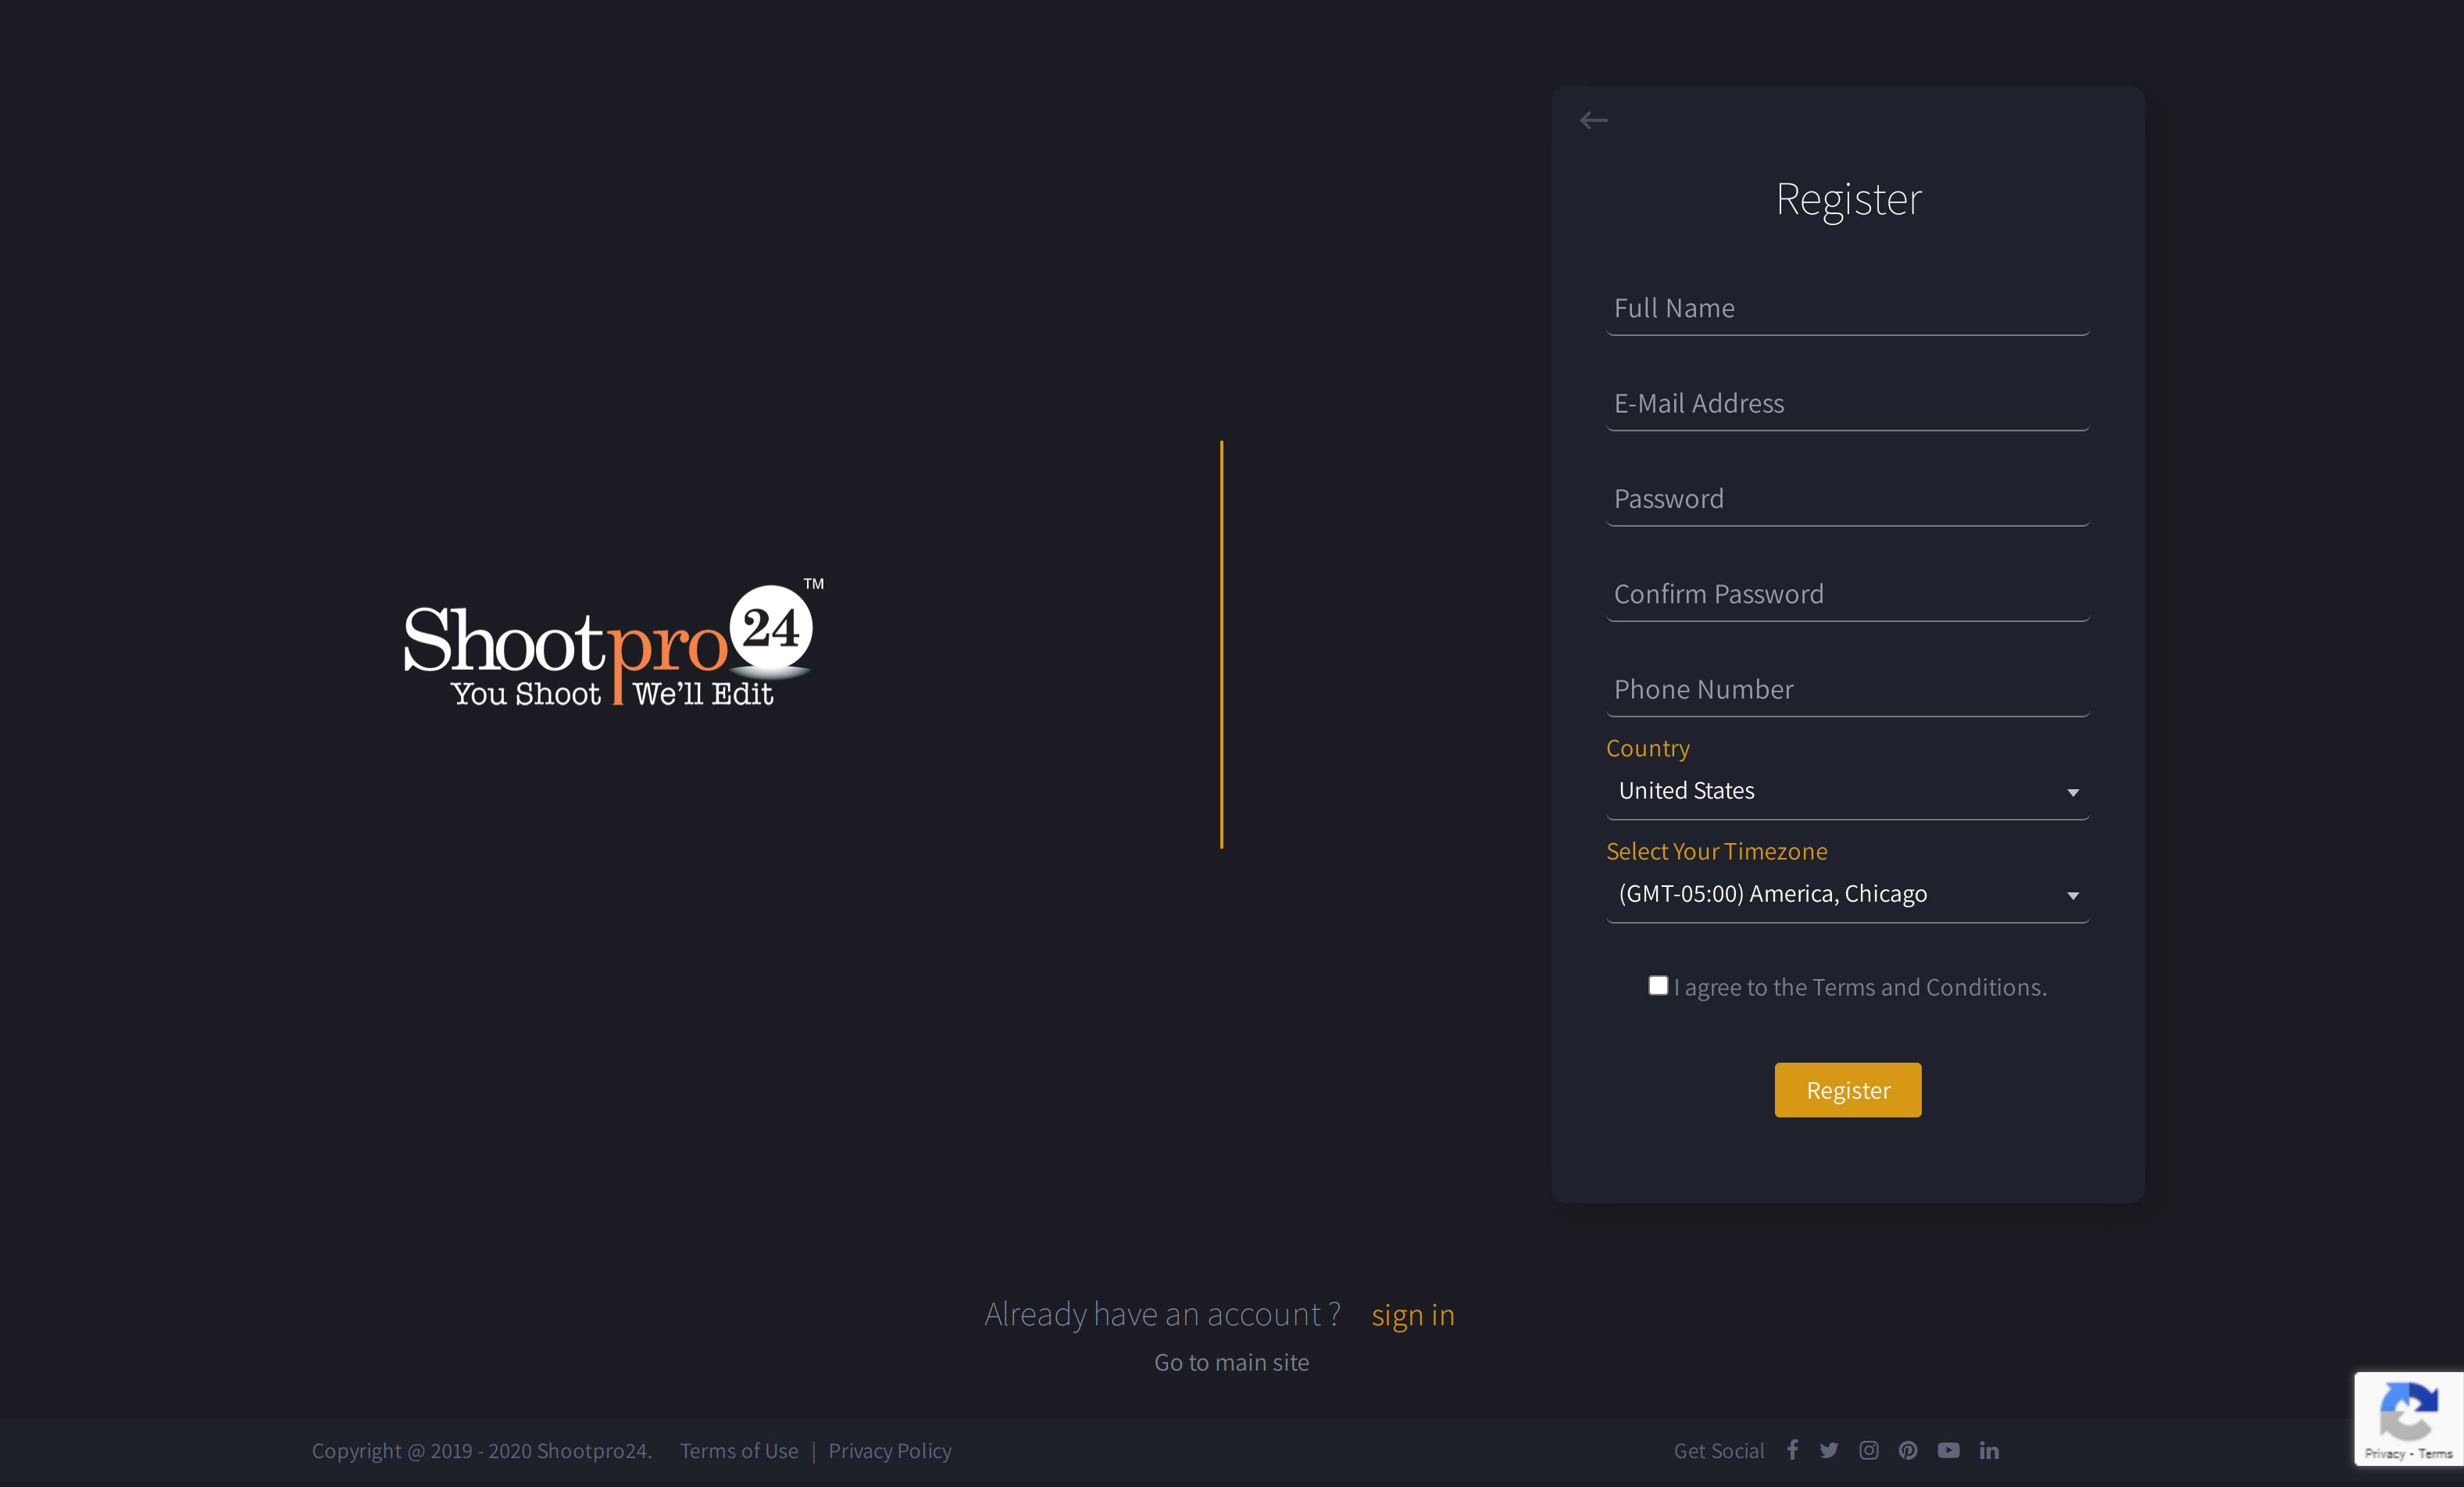
On the login page click Sign-up > Fill in the Form > Agree Our T&C > Register!
You can create a new project by logging into Shootpro24 with your e-mail ID and Password. You will land on your personalized page where you can create your new project by clicking on “+ Add New" button which is at the top-left side under the main menu bar.
See the process below:
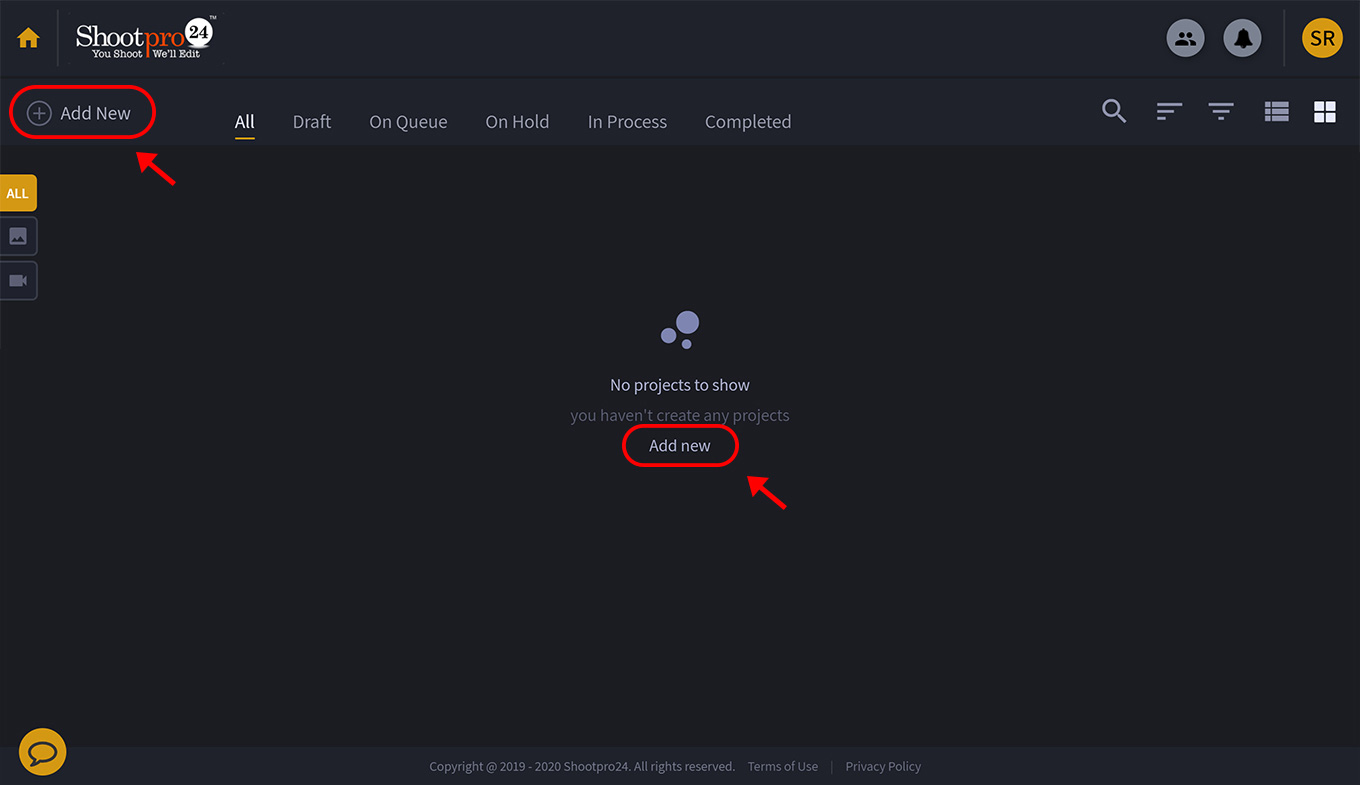
Click on "+ Add New" button for creating a new project

A pop-up window will appear where you need to enter your "Project Name" (1).
Select the type of project (Photo or Video) (2).
Click on the “Create” (3) button to proceed.
Once you create the new project and select the type of project under photo, a new page for adding “Basic Details" will be displayed .
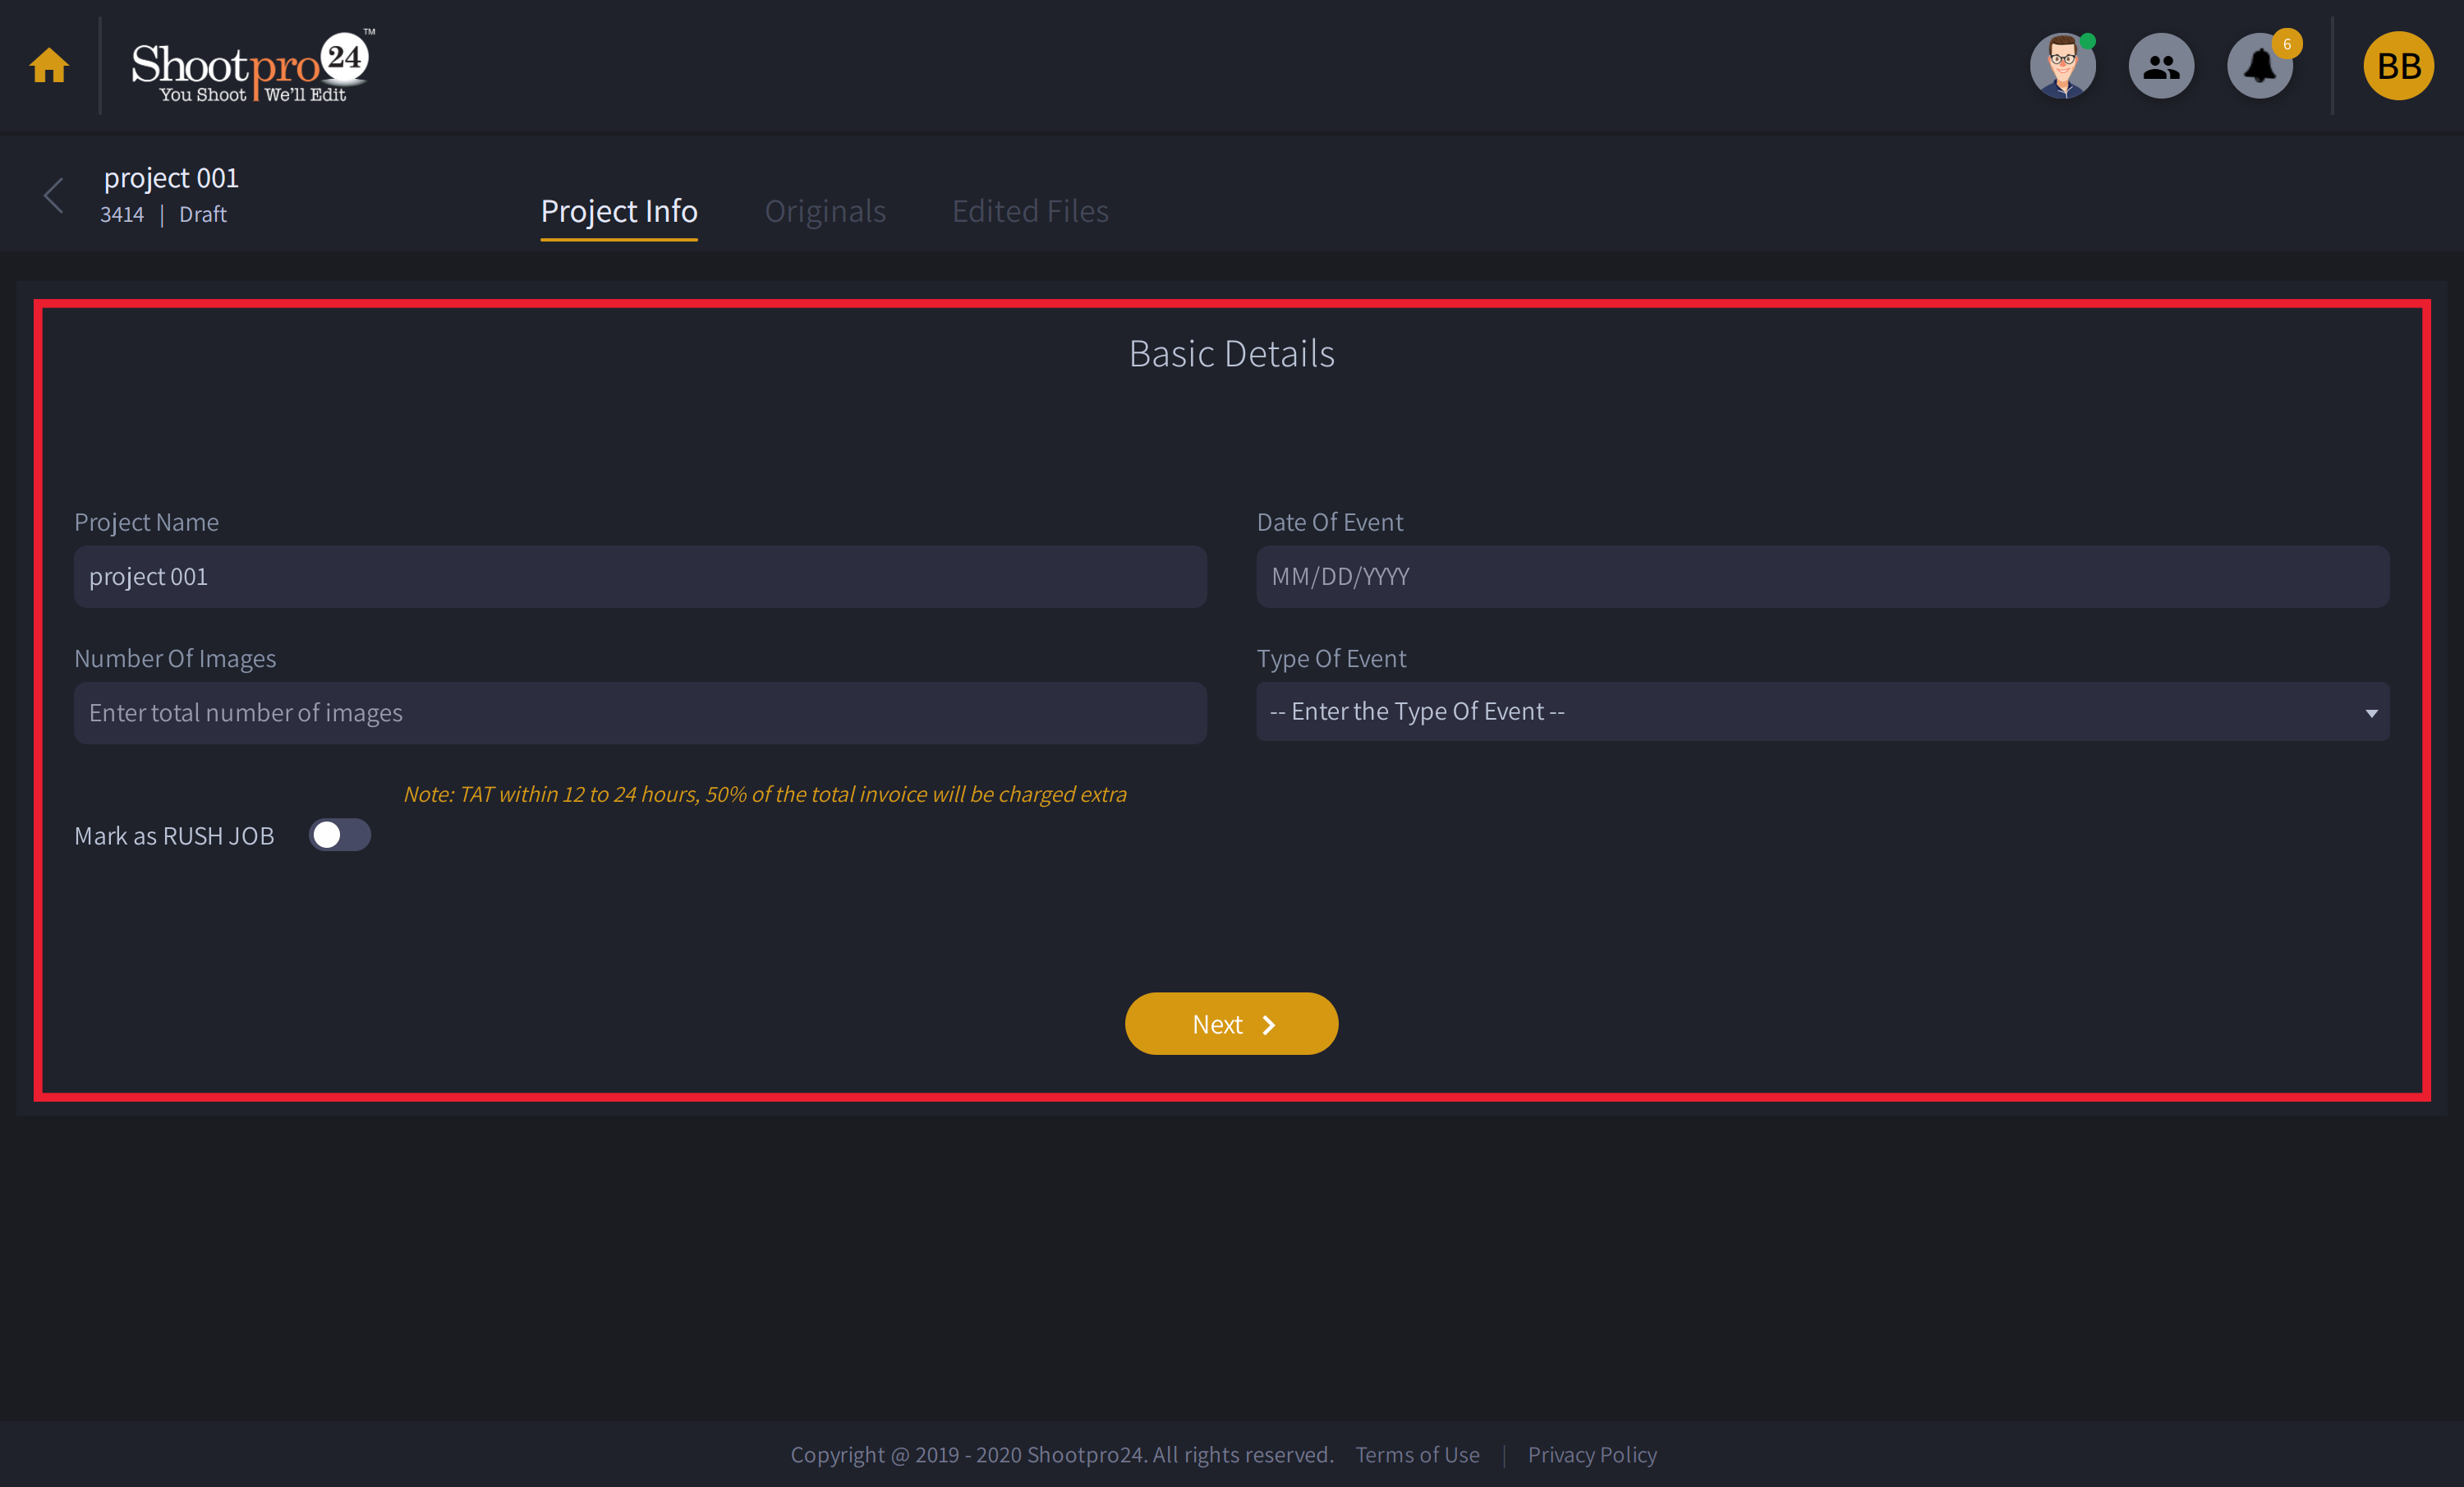
This section includes:
Project Name
Date of Event
Number of Images
Type of Event
Mark as Rush job
You can add details to corresponding input boxes and click "Next" to proceed. If you need the project urjently, you can mark it as a rush job.(Note: TAT within 12 to 24 hours, 50% of the total invoice will be charged extra).
Once you added the "Basic Details" and click next button, a new page for selecting the services will be displayed . Click on required service boxes to select a service.
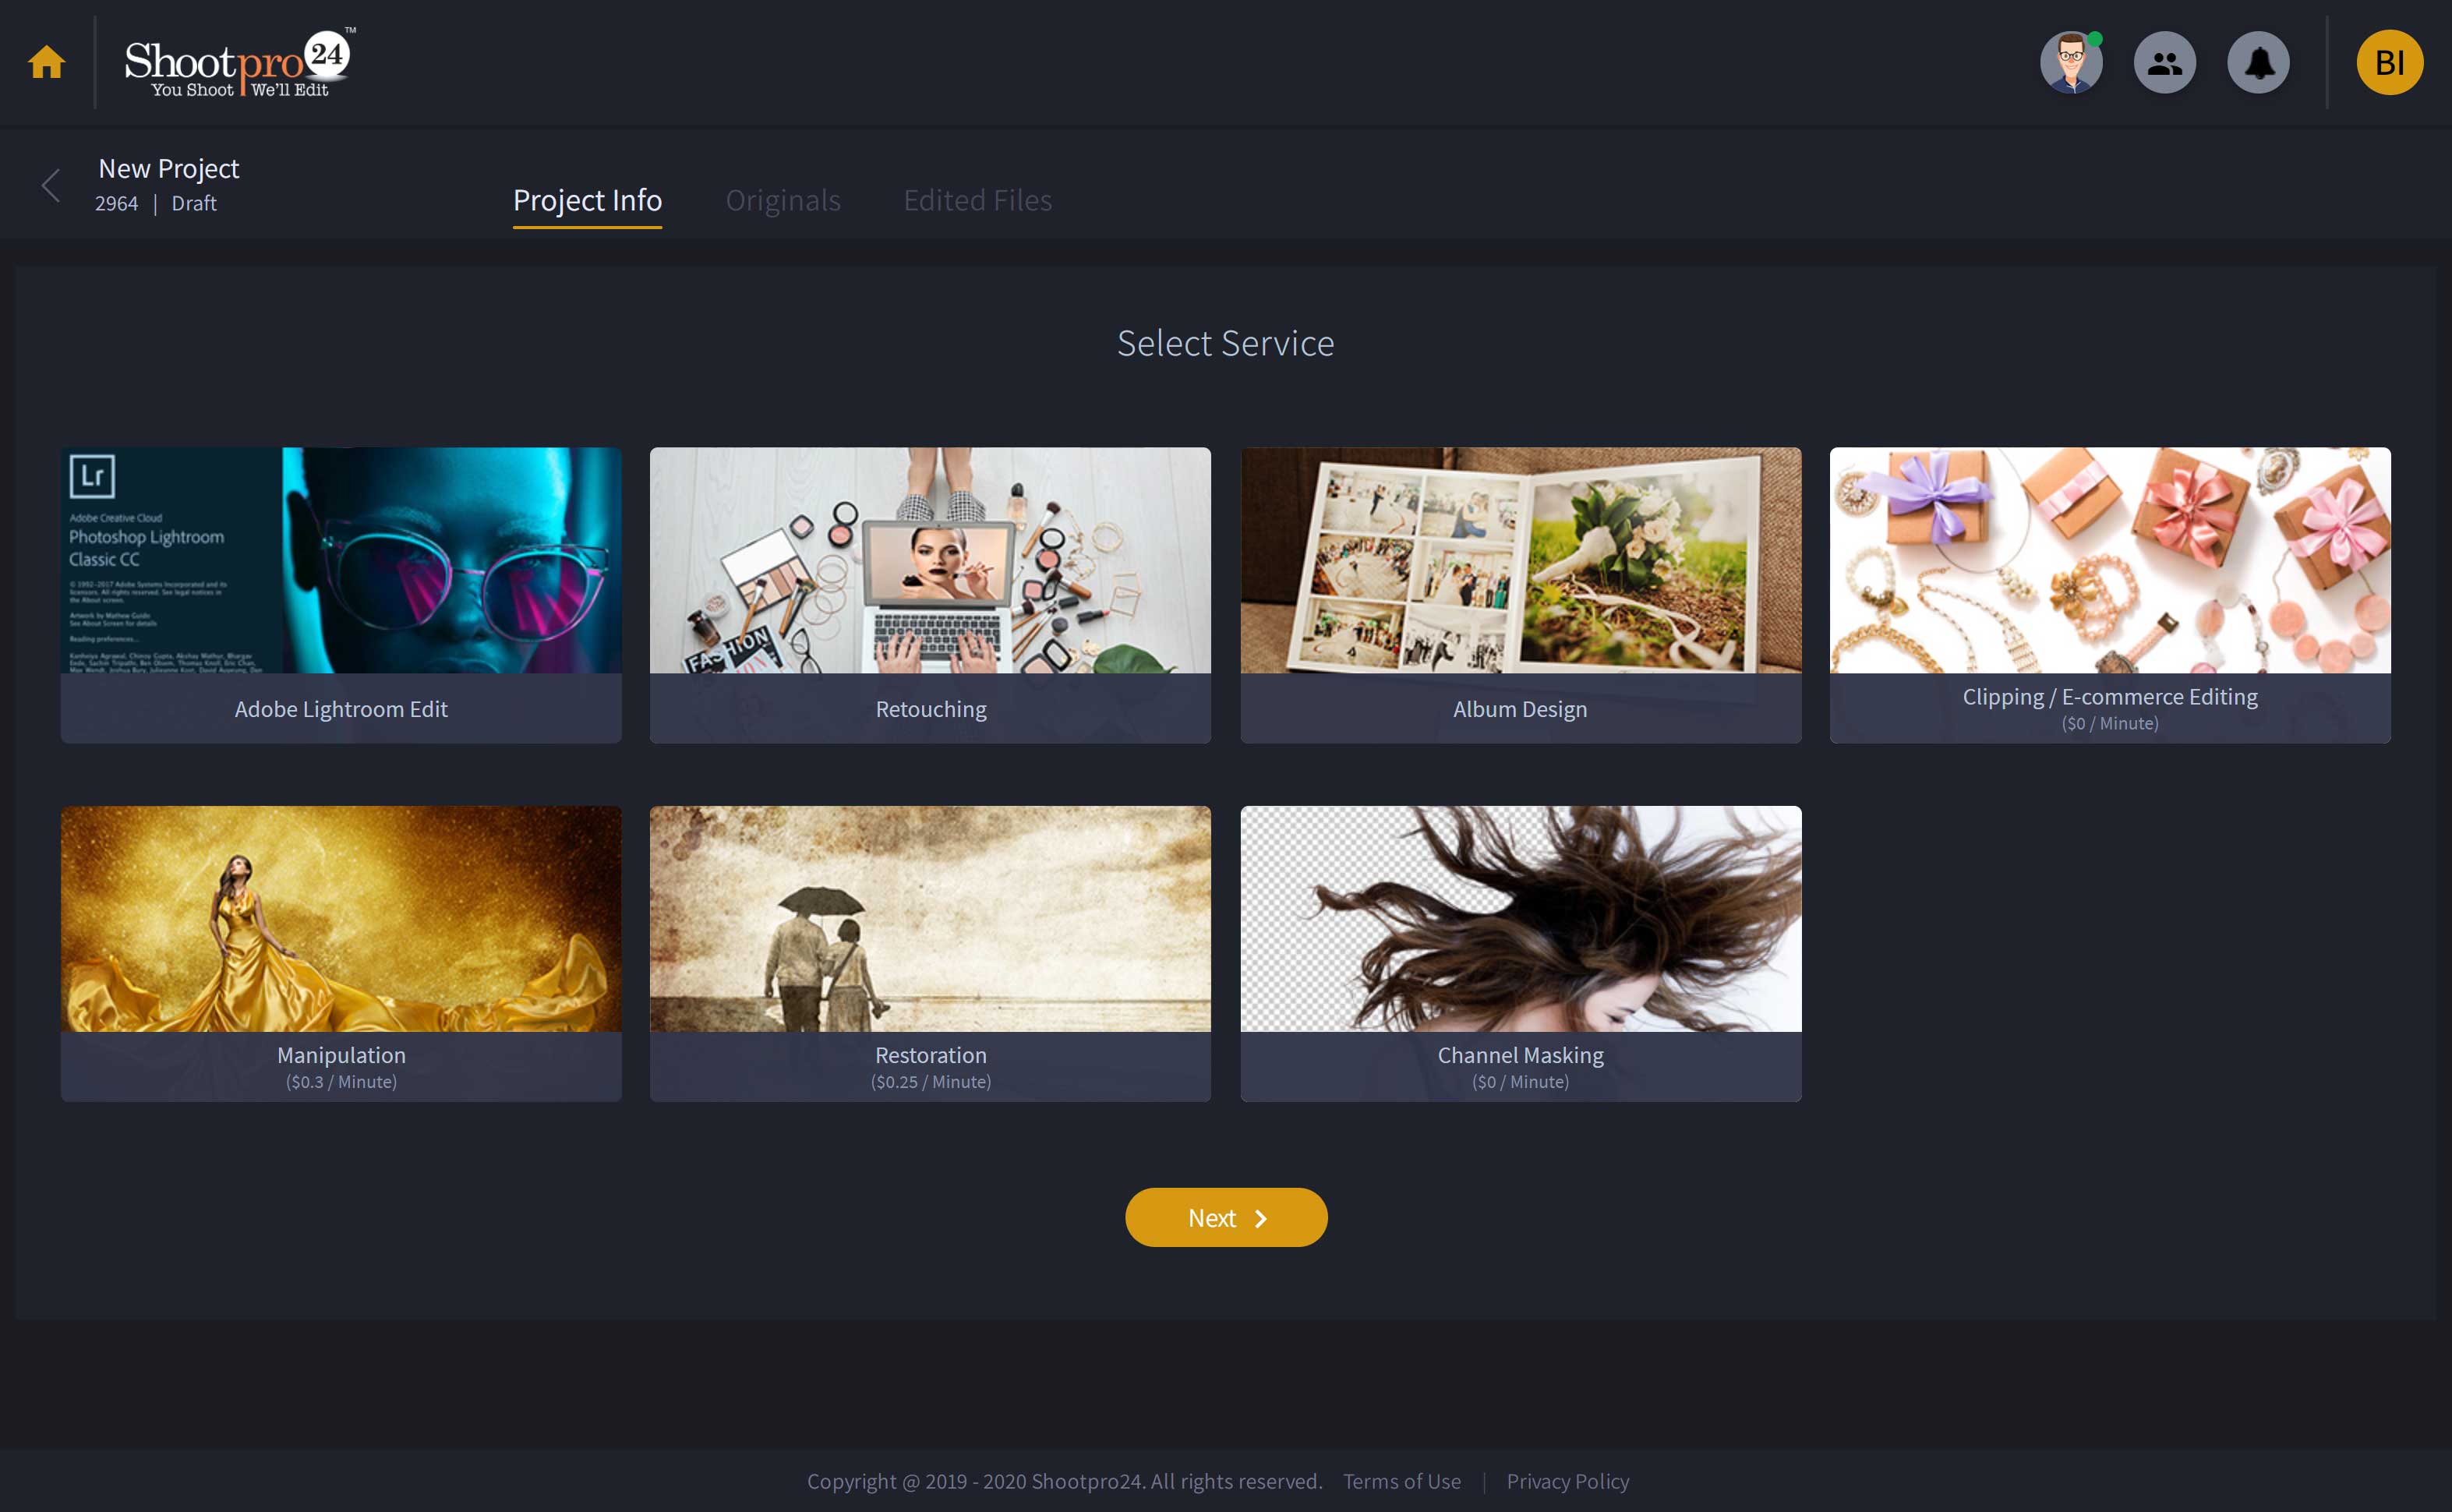
The professional photo editing services at shootpro24 offers:
Adobe Lightroom Edit
Photo Retouching
Album Designing
Clipping/E-Commerce Editing
Manipulation
Restoration
Channel Masking
After you have selected the required services click "Next" button at the bottom to continue. To set editing preferences you may slide up a new page for adding "Editing Instructions and Input/output format details"
You can add general Instructions on the input box or our experts at Shootpro24 can upload your instruction as a file. To attach Instruction file, click the "Upload Instruction as File" Button.

If you have limited images and you want to specify instructions for each image, you can use "Provide Image-wise Instruction" button.
Once you click on "Provide Image-wise Instruction" button, there shows a small popup for adding the count of images. Enter the total "number of images" and click "OK" to continue to the next popup.
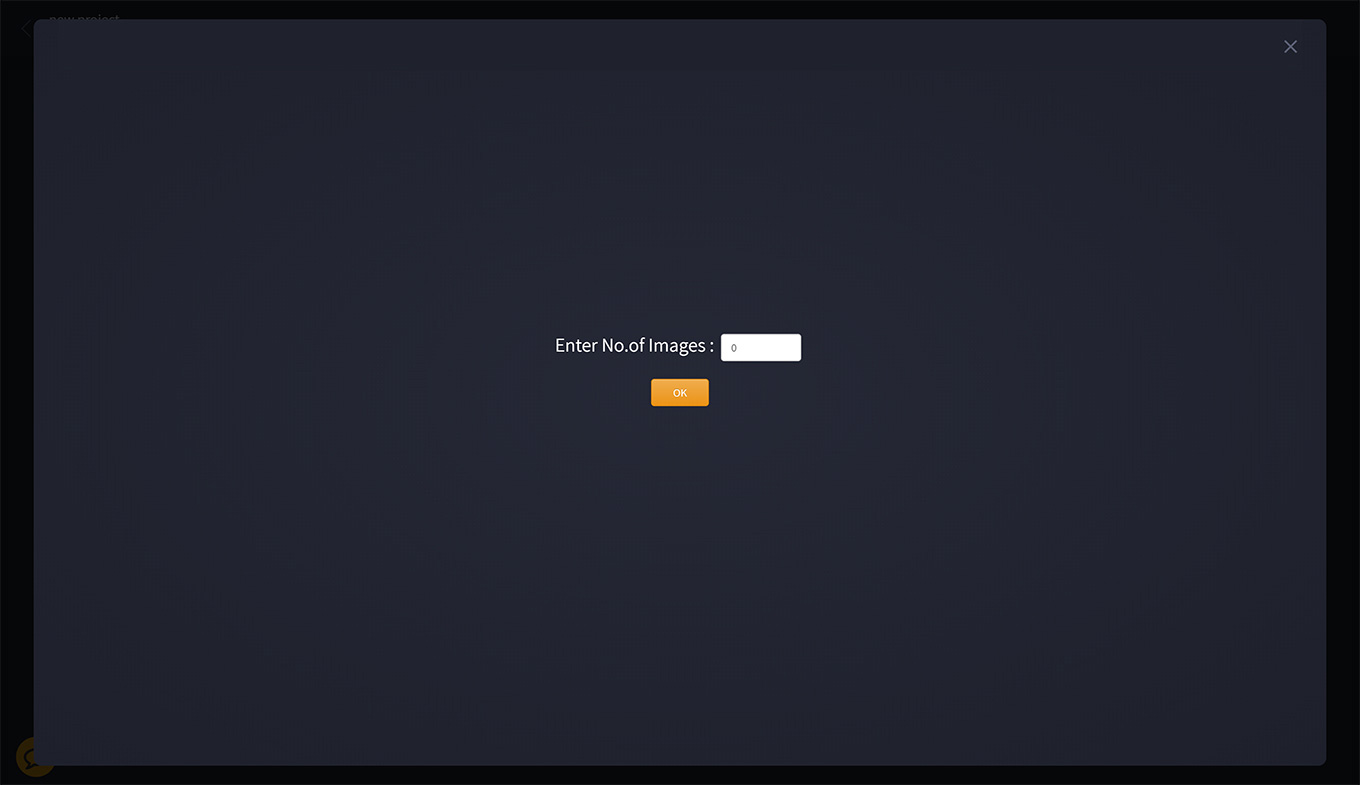
The next popup contains two columns. The first column is for entering the image name and the second column is for adding instructions. You can enter the "Image names" and "Instruction" for each images and then click "Save" to continue.

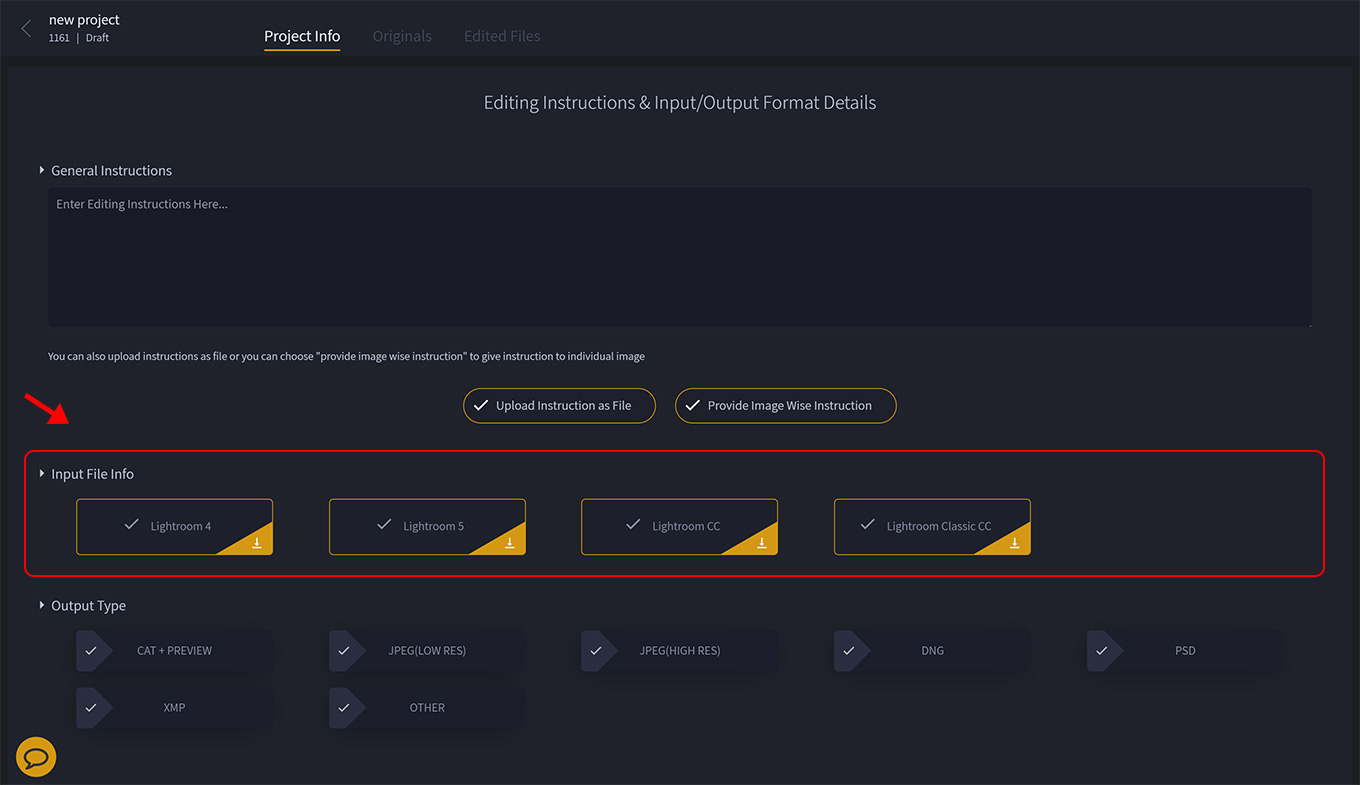
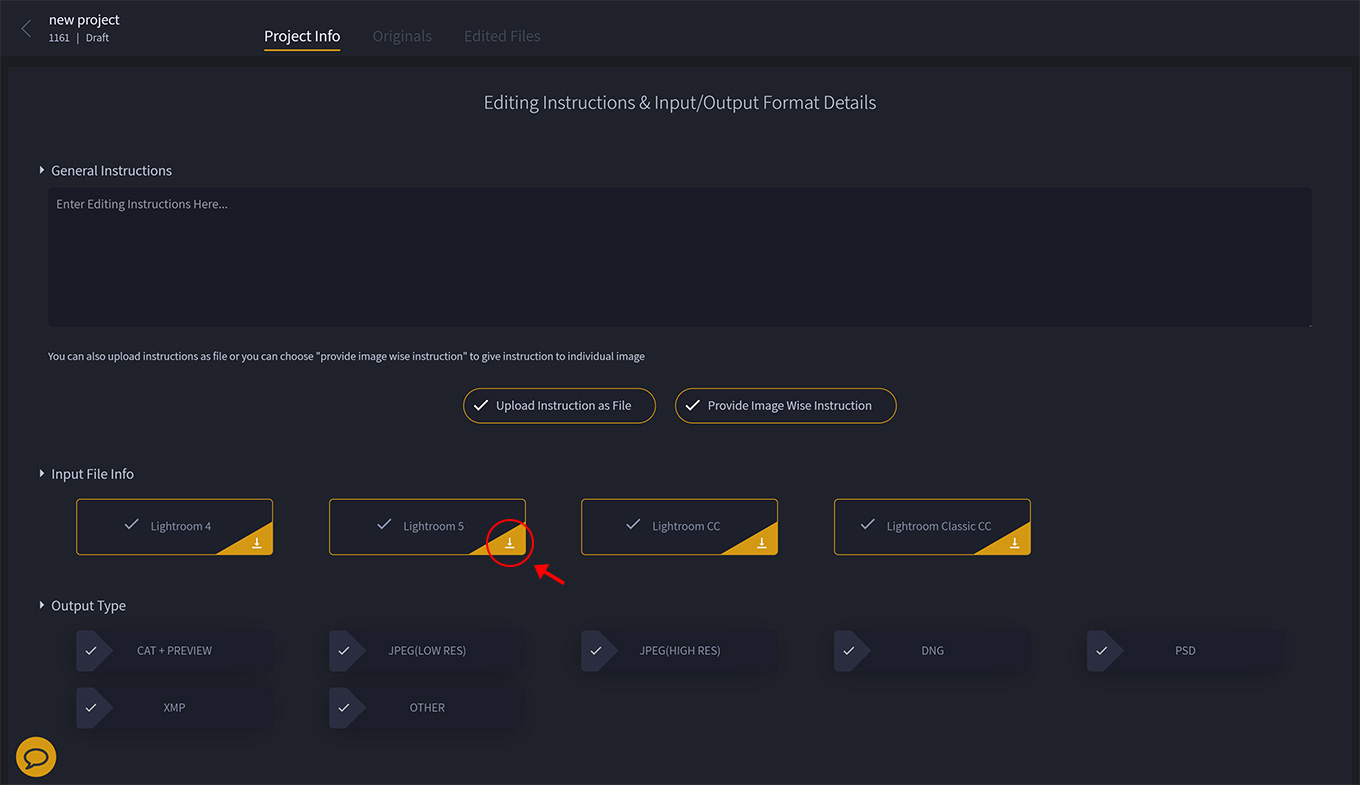
No. If you’ve selected the "Adobe Lightroom Edit" service while choosing the type of service, then it’ll have an additional section for selecting "Input File Info". You can choose the catalog you were using. There is an additional option for downloading the Lightroom catalog.
Yes, there are advanced image editing options which you can set by enabling the "Customize Export Settings" while uploading the photos.
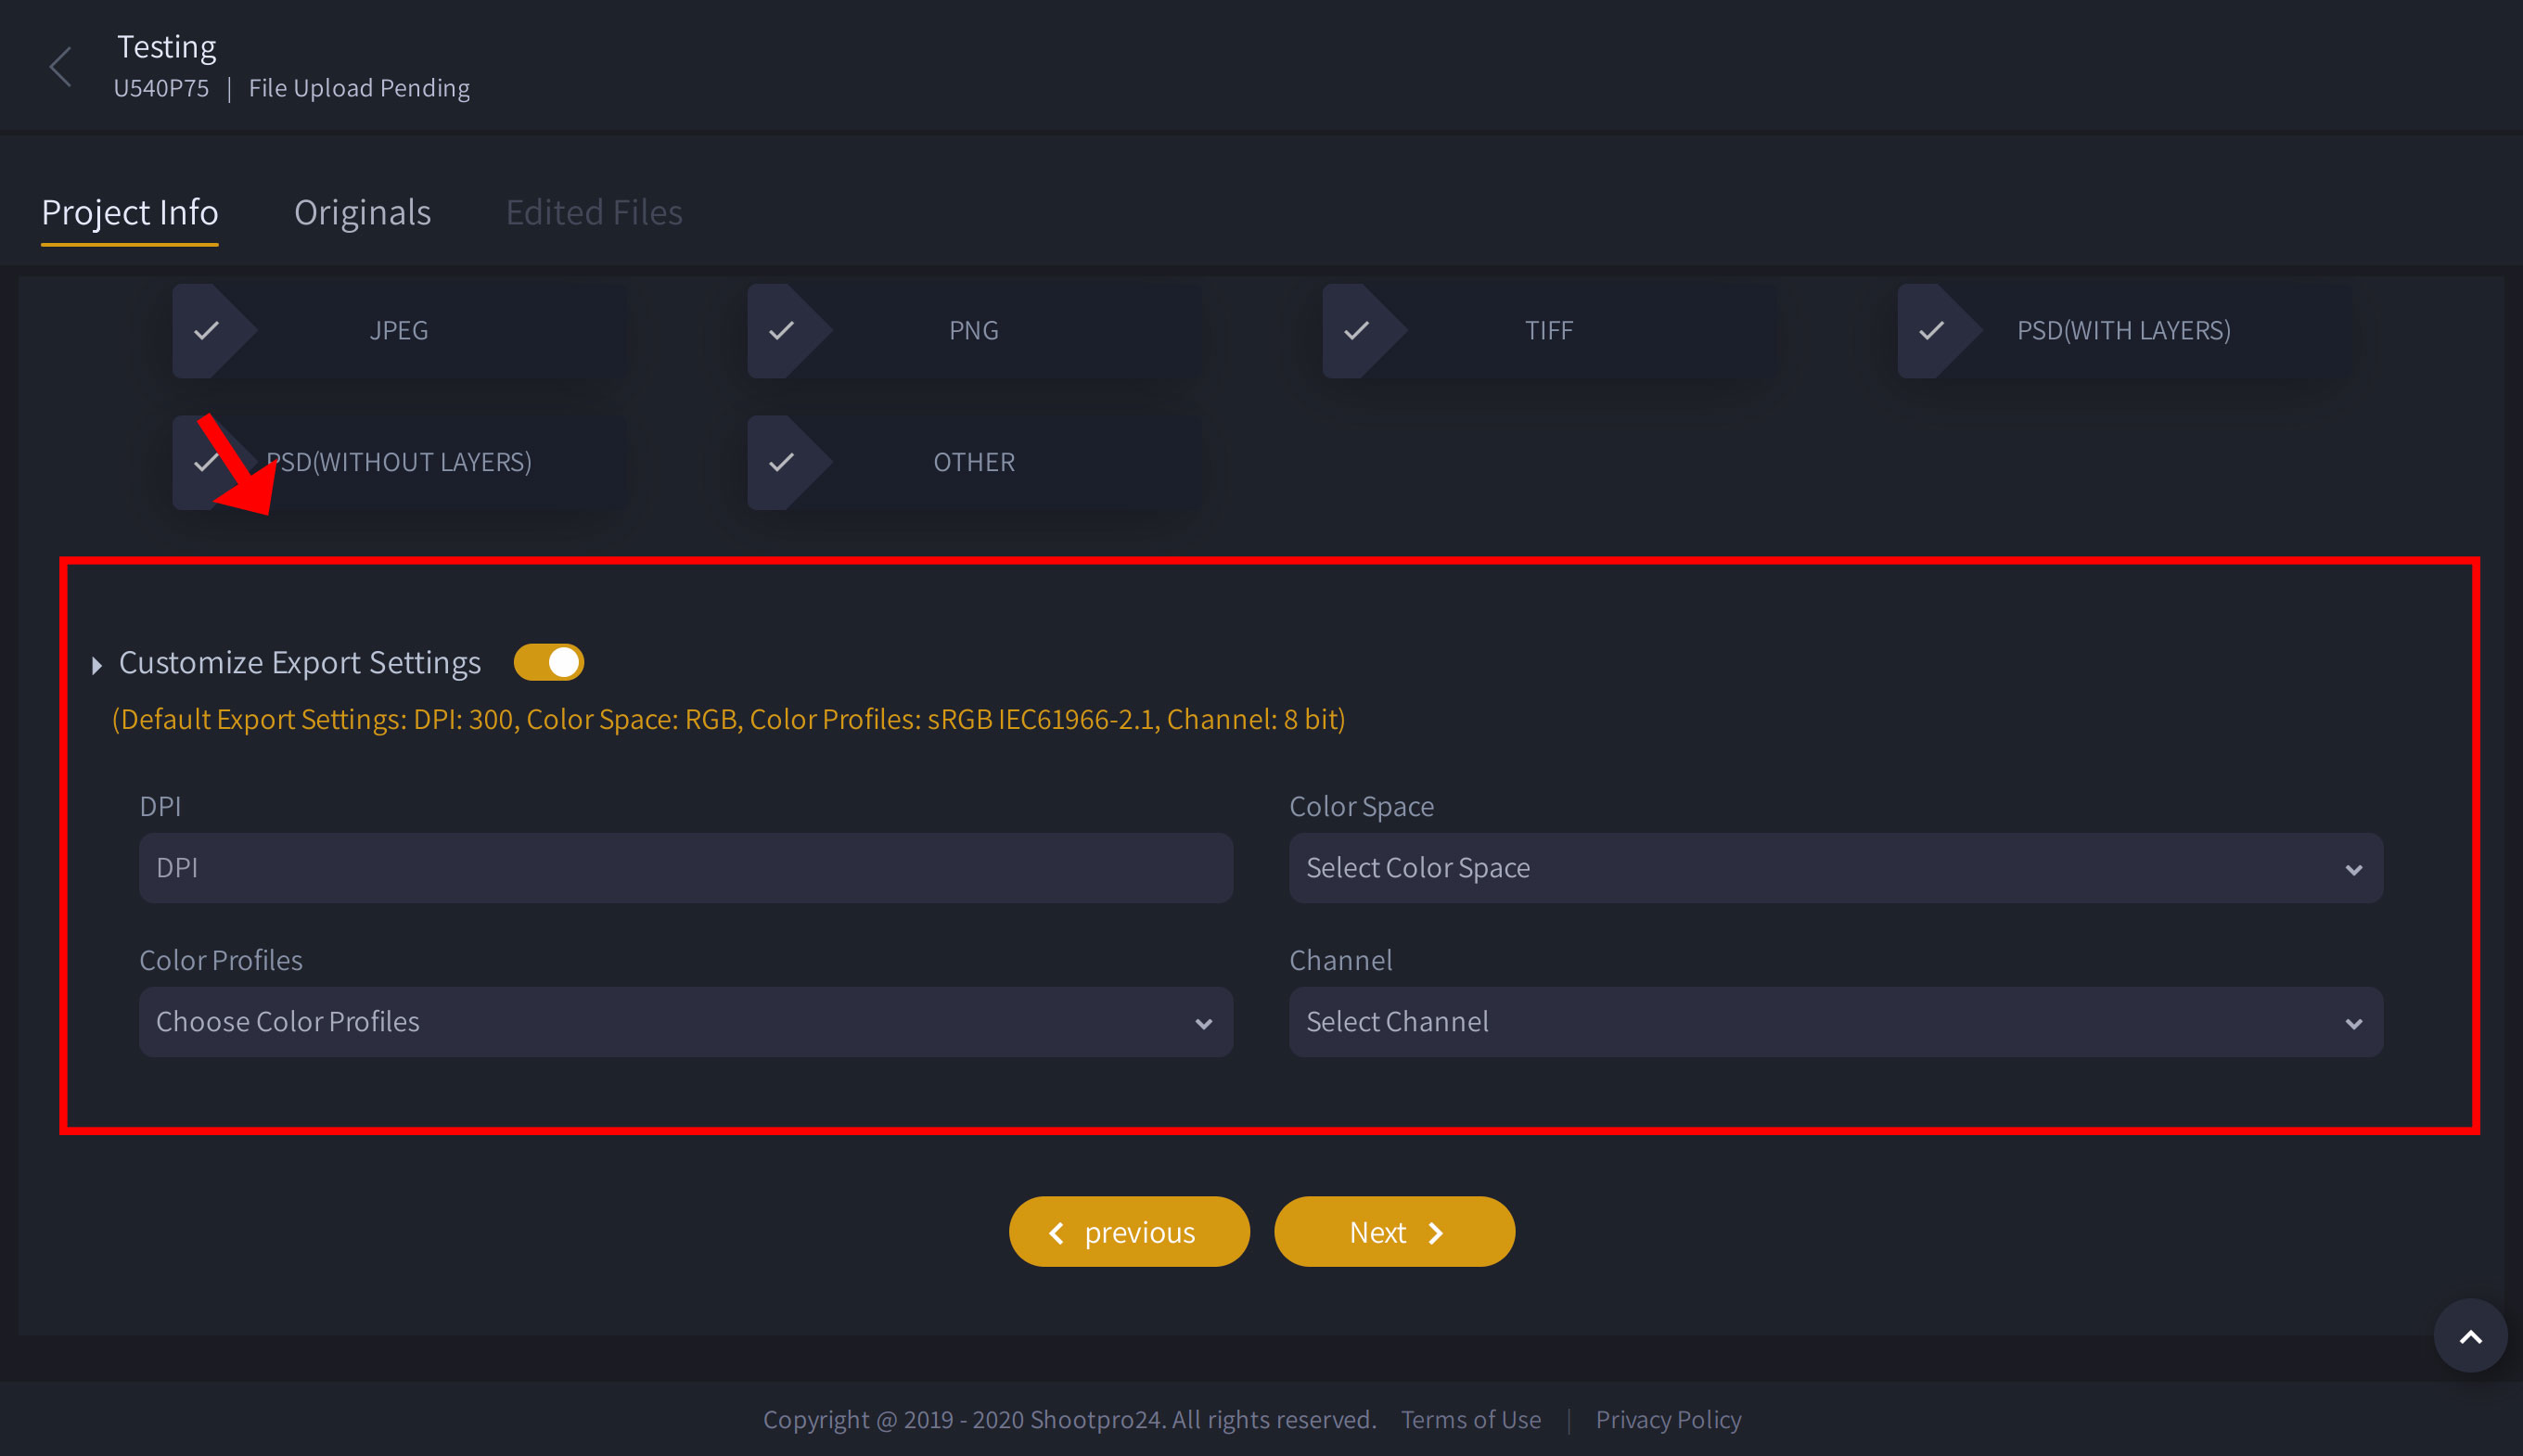
Advanced Setting has four options and they include:
DPI (Dots Per Inch)
Color space
Color profile
Select Channel
You can add details to these options and click "Next" to continue.
No. If you selected the service "Adobe Lightroom Edit", The export settings will also change.

Advanced Export Settings Contains:
File settings
Image sizing
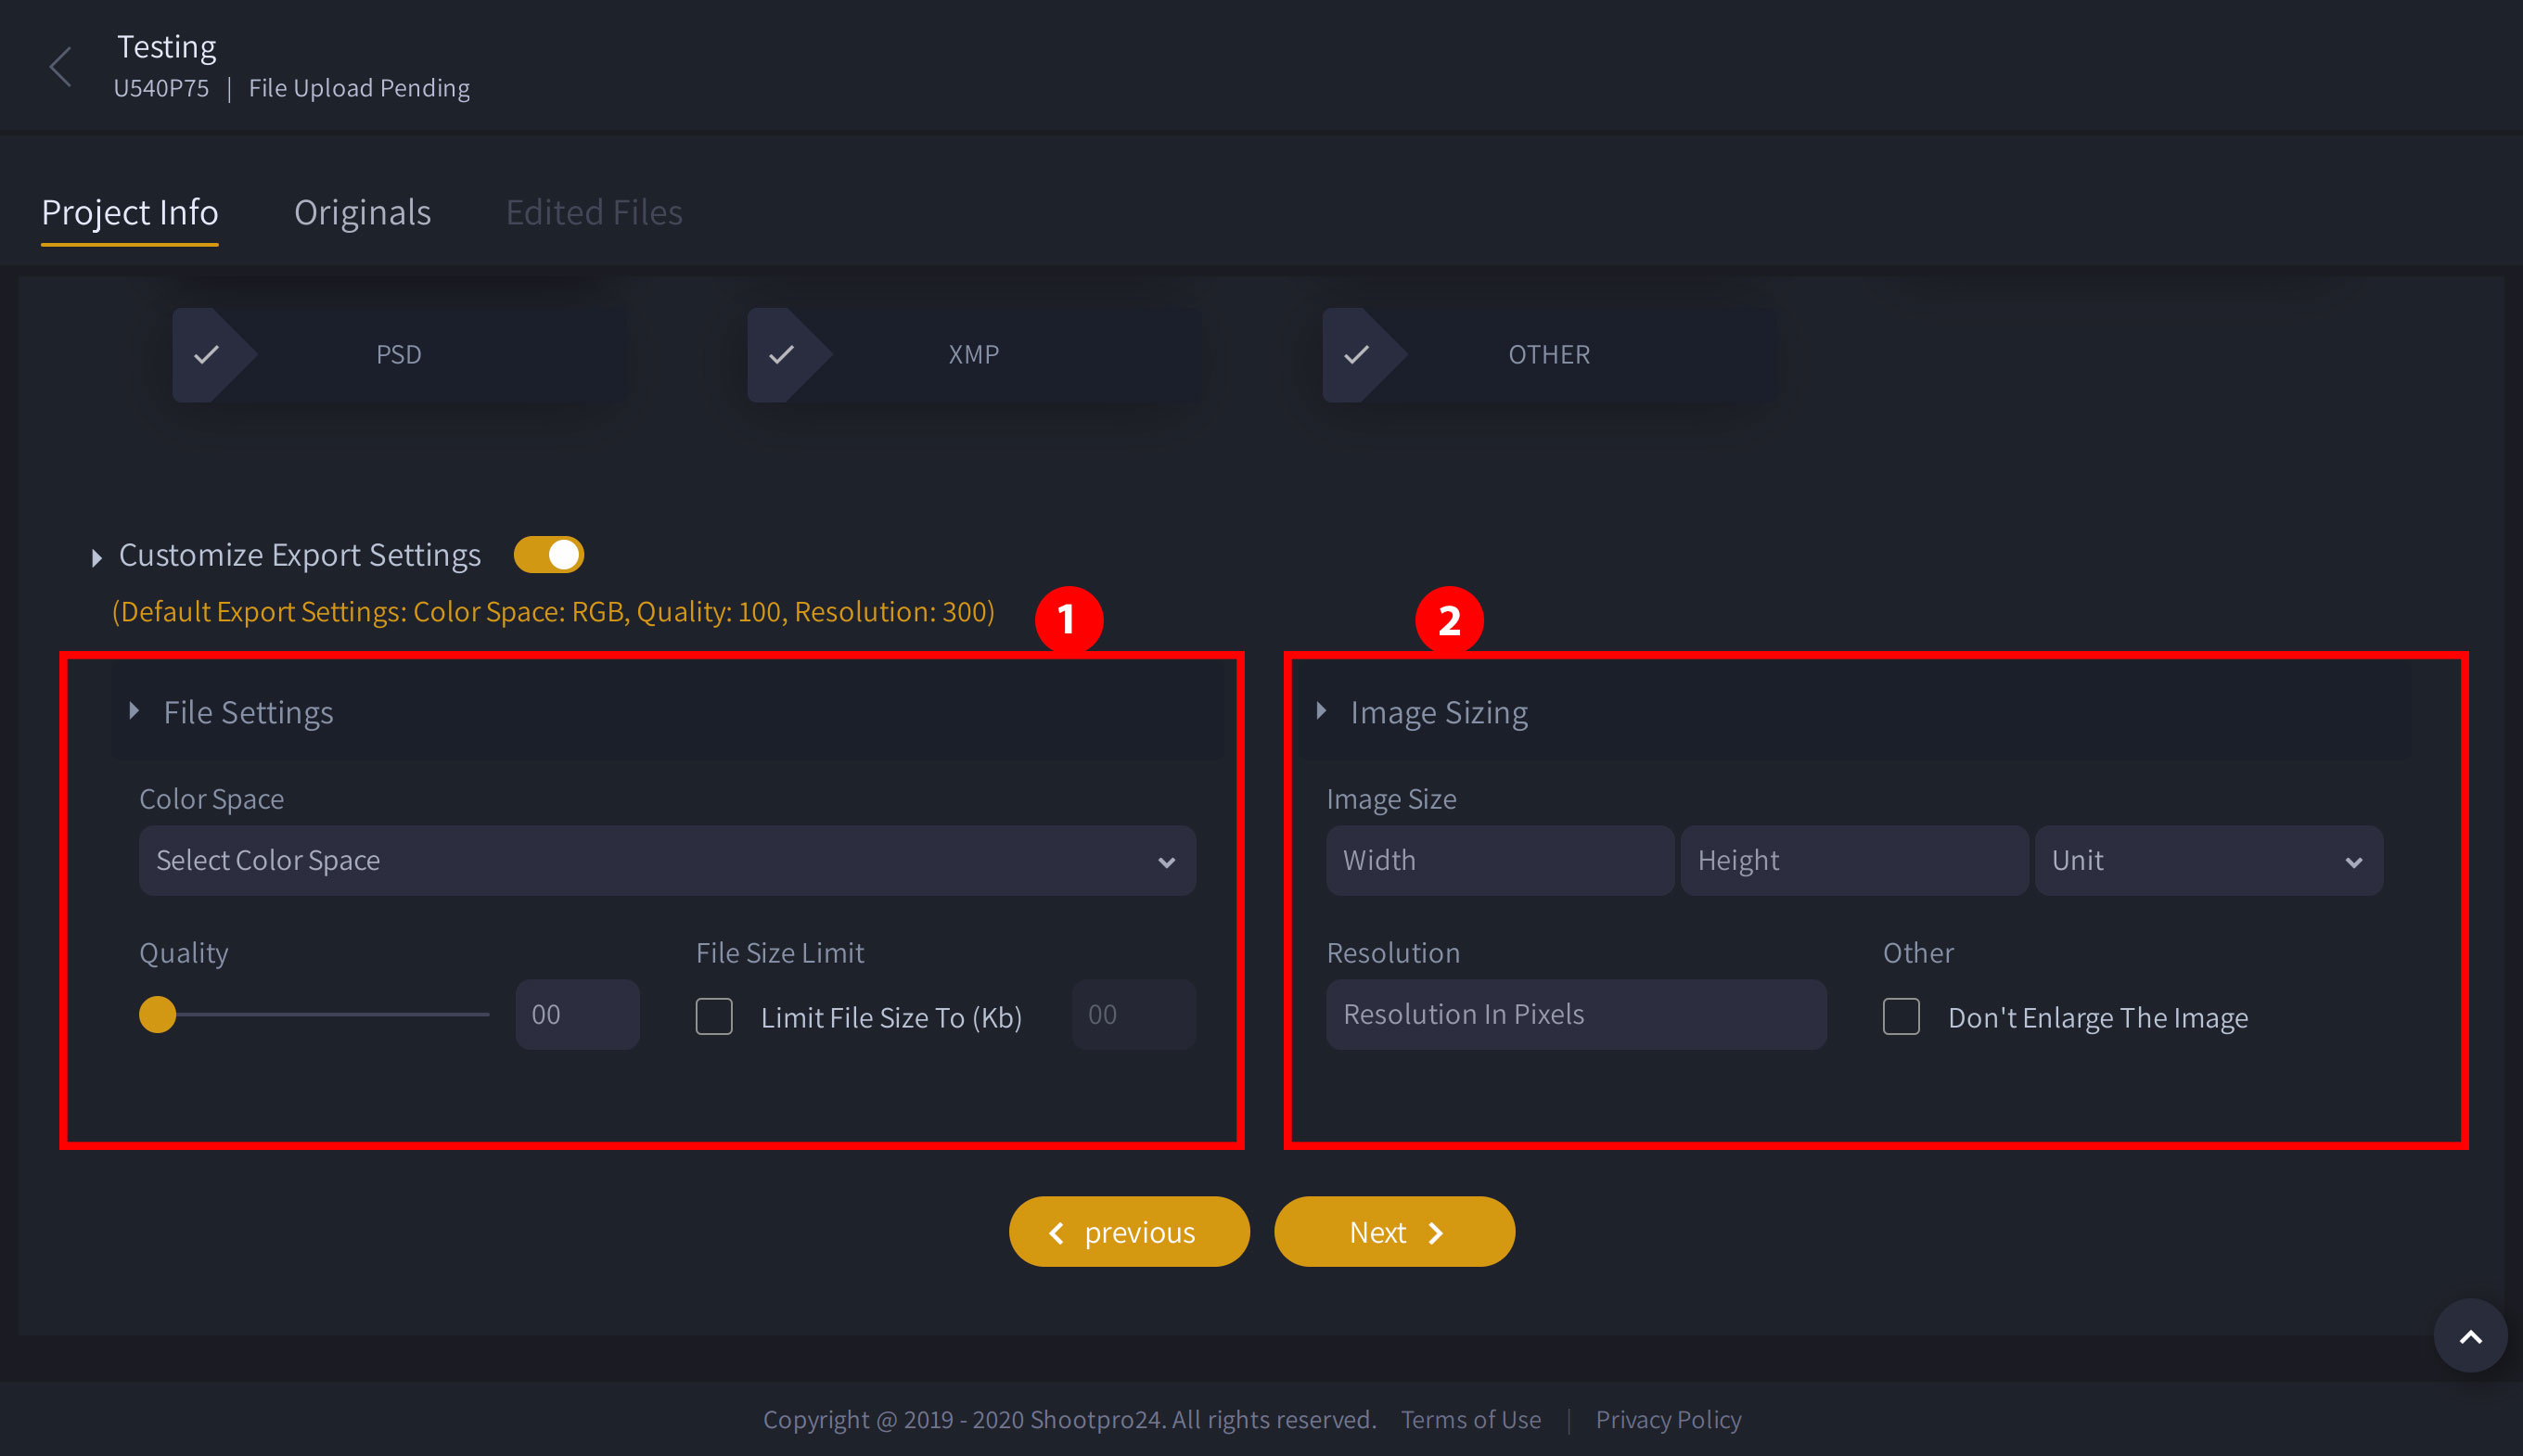
"File Settings” (1) will have the options like "select color space" , "Quality", and "limiting the file size to".
“Image Sizing” (2) includes options like “Width", "Height", "Unit", "Resolution in Pixels" and "Don’t Enlarge the image".
After completing/choosing the required sections click "Next" to move on to the next section.
To download Adobe Lightroom catalog, there is a download icon for each catalog boxes.
Yes. We will return your images in the following formats:
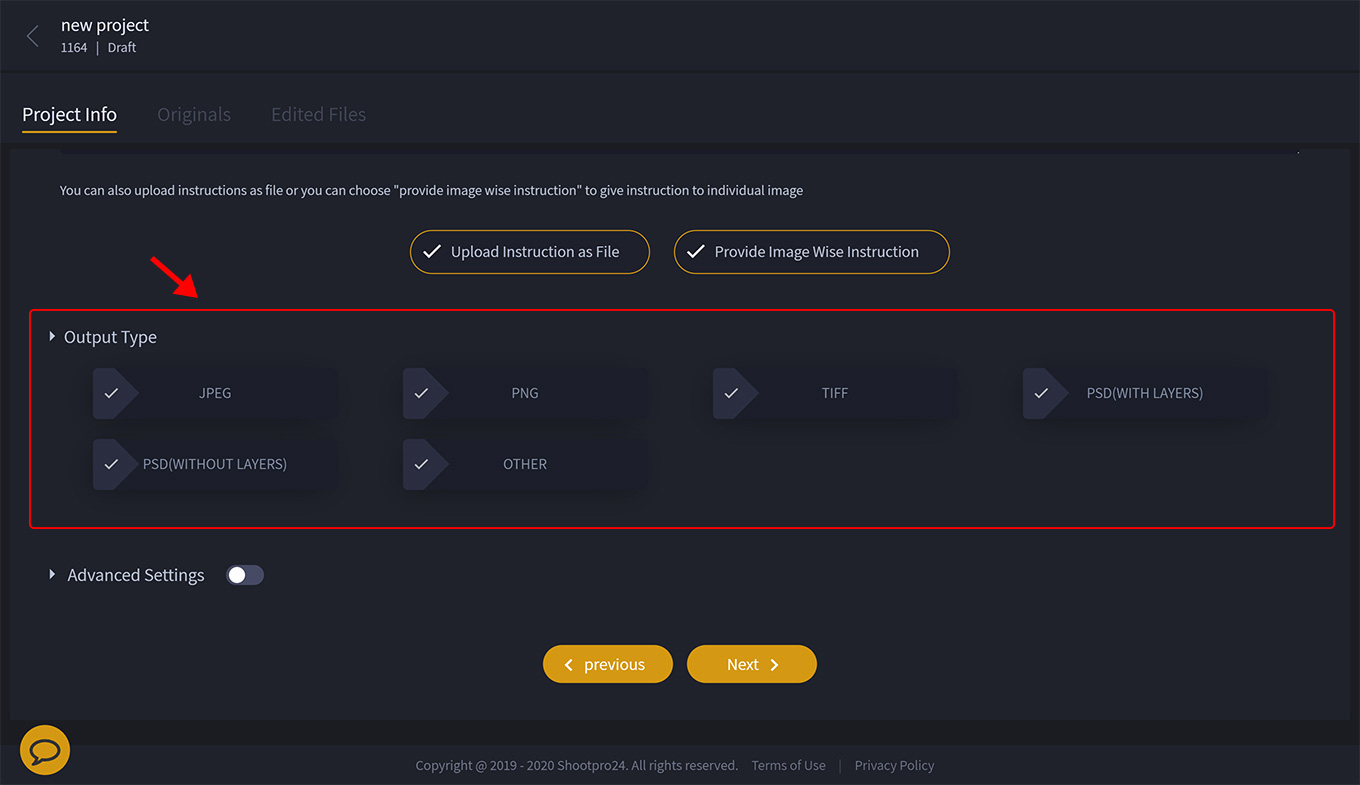
JPEG
PNG
TIFF
PSD (with Layers)
PSD (without Layers)
Other
You can select from this list or mention the output type by clicking “Other" option.
To receive the photos in your desired format, you have to select the “Output Type” while uploading the file for editing. Output type changes according to the services selected.
There are five different pricing packages are available for Video Editing. They are:
Shootpro24 Signature Package
Collaborate & Create Package
Custom Cinematic Production
GoPro Video editing
Corporate or Event Video Editing
Select from the most appropriate pricing package and proceed for next.
You can set Video Editing after selecting the project type as "Video" on step 1, it will display a new page.
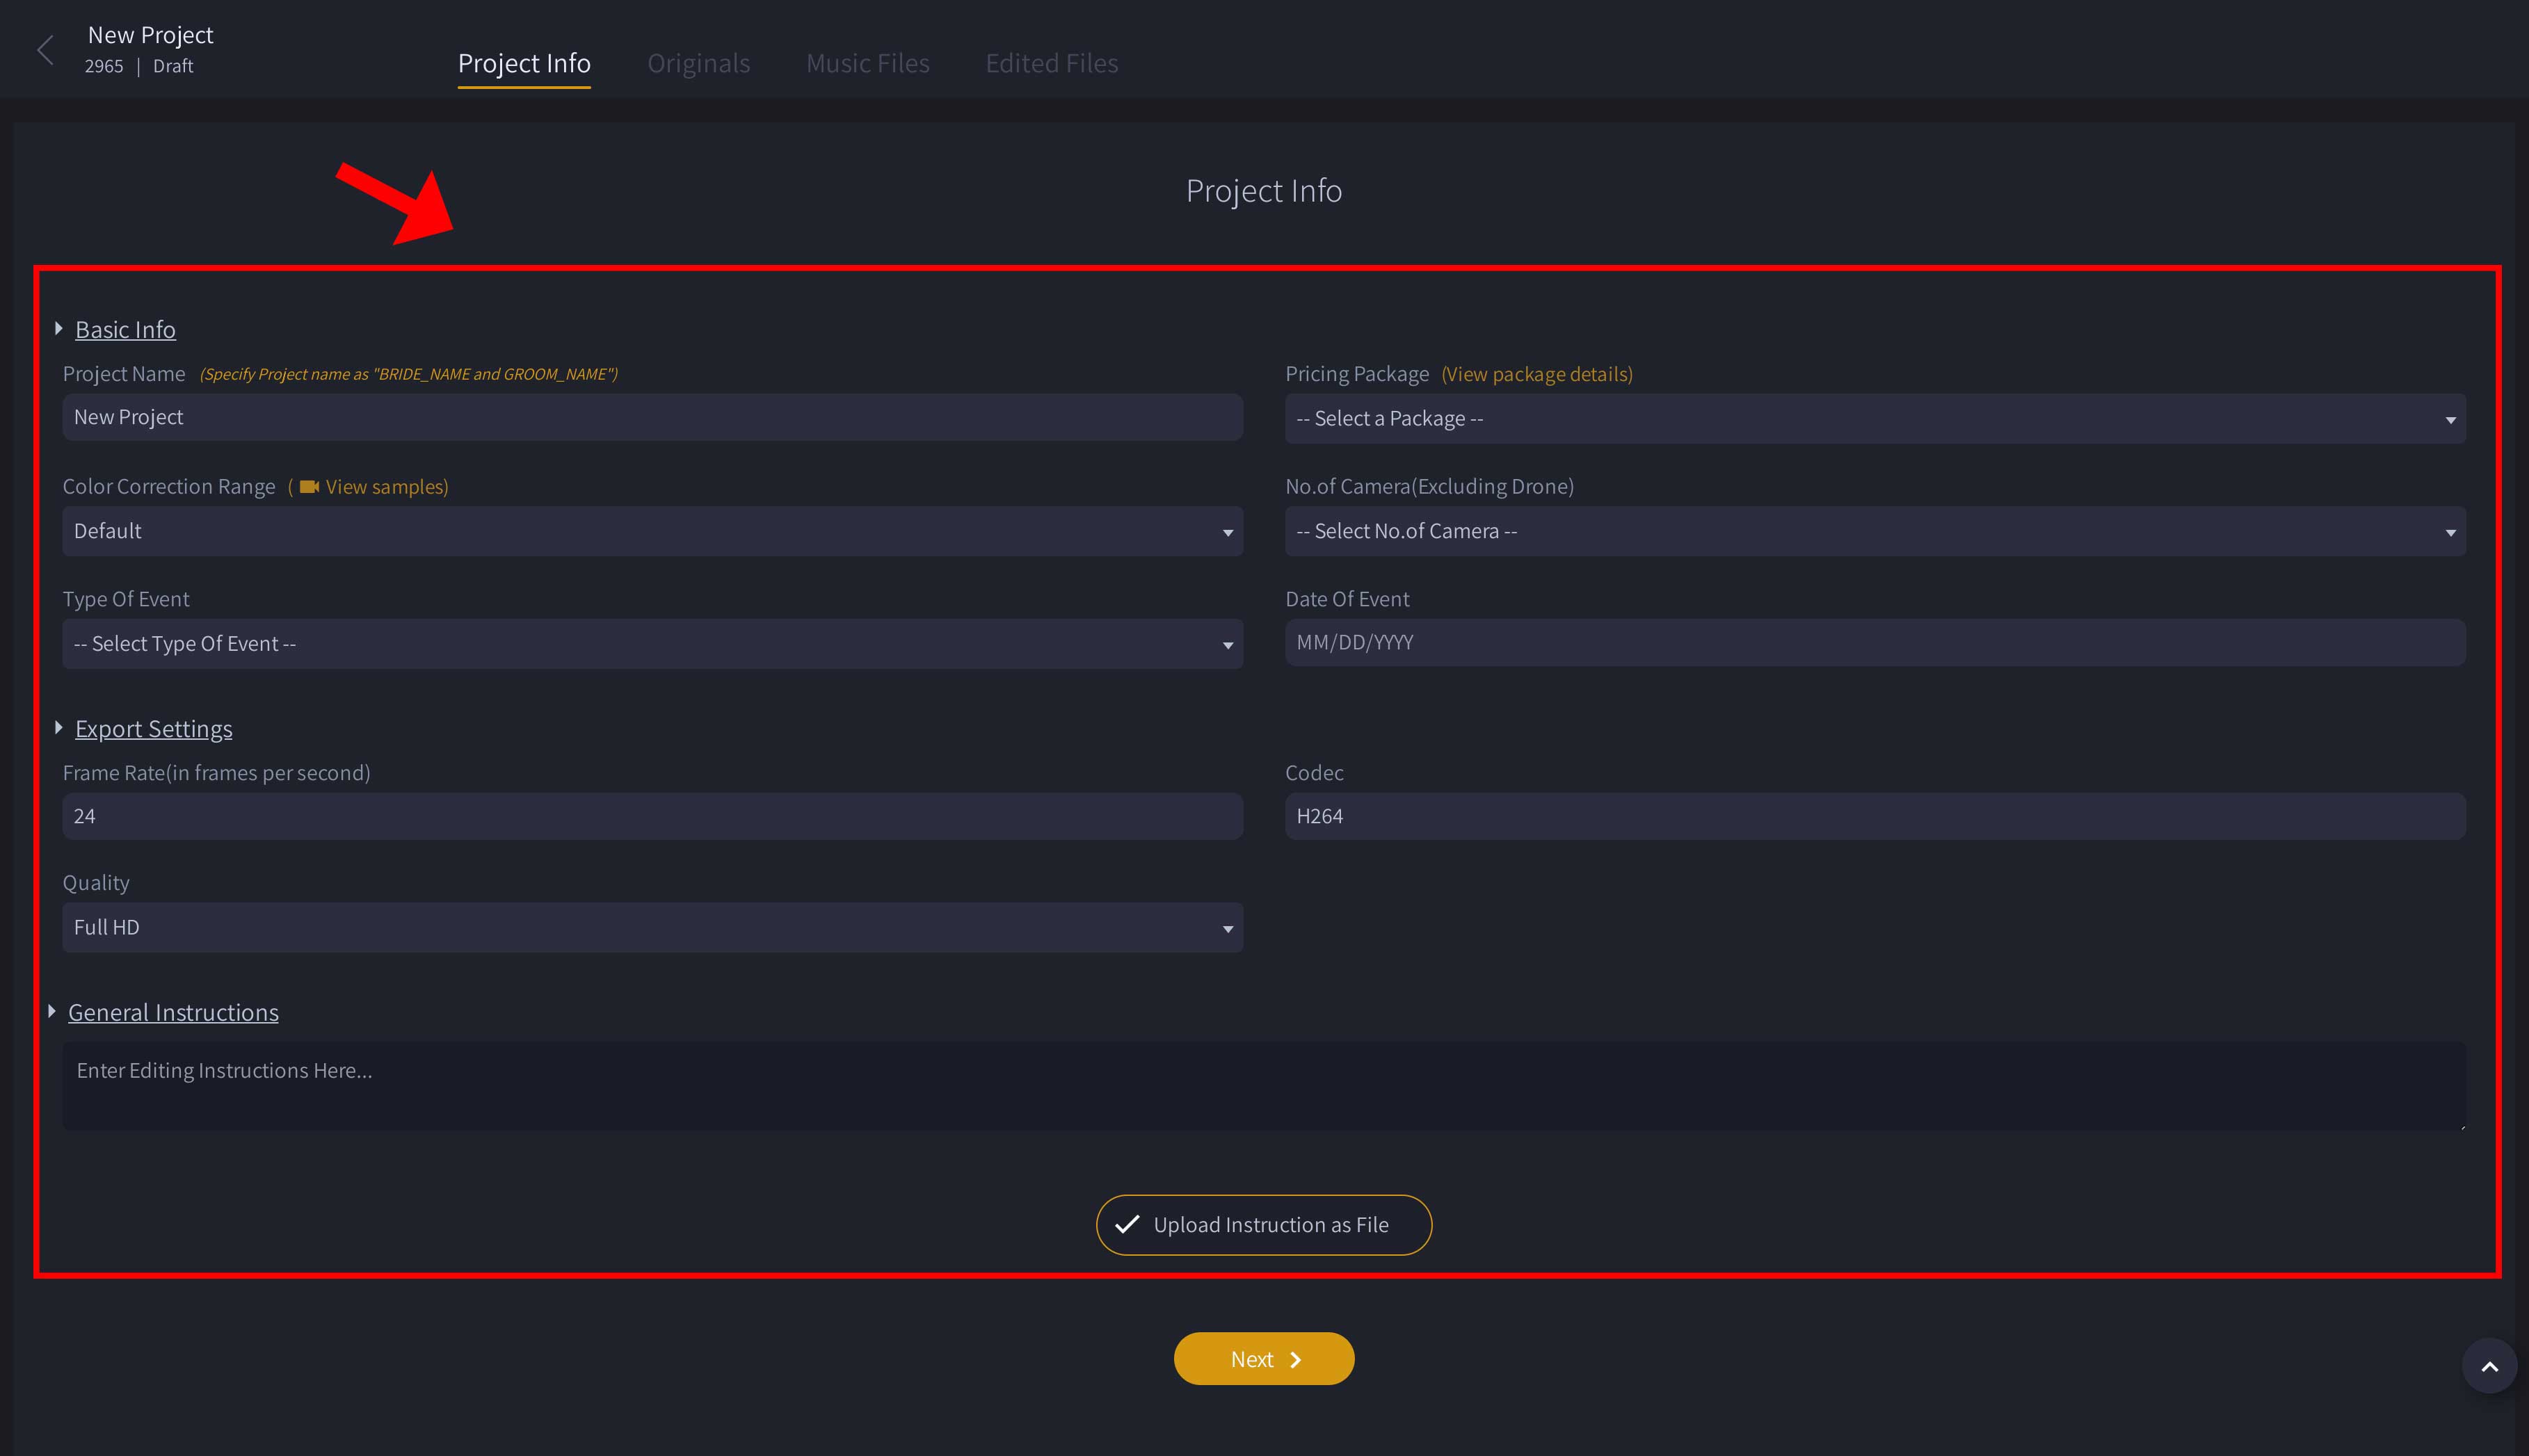
This page will give you some options such as:
Project Name
Pricing Packages
Color Correction Range
No. of Camera
Type of Event
Date of Event
Frame Rate
Codec
Quality
General Instruction
To upload your image or video files, you may simply login with your e-mail ID and password at Shootpro24 to create a new project.
Once you create the project, it will display the new project home page. There are two boxes displayed at the home page and you can see a "+ Upload" button on the second menu bar.

Click on " + Upload "(1) button, It will show a list of options such as "New Folder" , "Upload Folder" and "Upload Files". You can select the appropriate option from this list.
You can also use the "click here" button on the first box (2) to upload photos or videos/ you can drag and drop files into the first box (2) to upload files.
The second "Upload Folders" box (3) can be used if you want to upload files as a folder.
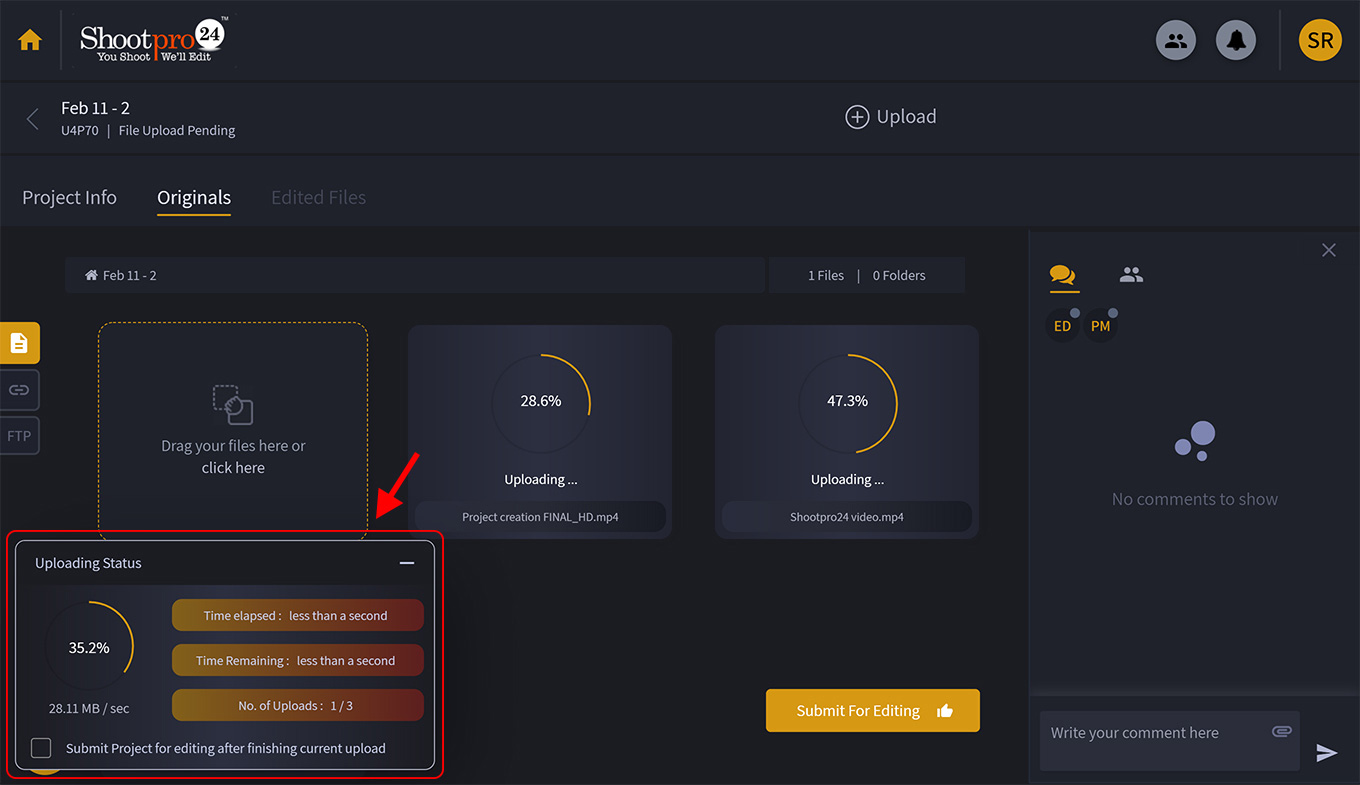
When the uploading has initiated, it will display a popup on the left side at the bottom of your project window. It shows the progress of upload, number of uploads, time elapsed, and time remaining.
You can submit the project for editing by clicking "Submit for editing" button at the bottom on the right hand side of your screen.

Yes, you can submit the project for editing if you have large size of files and don't want to wait until the project upload is over. To avoid this inconvenience, we have set an option for you to submit the files automatically for editing. This how it is done:
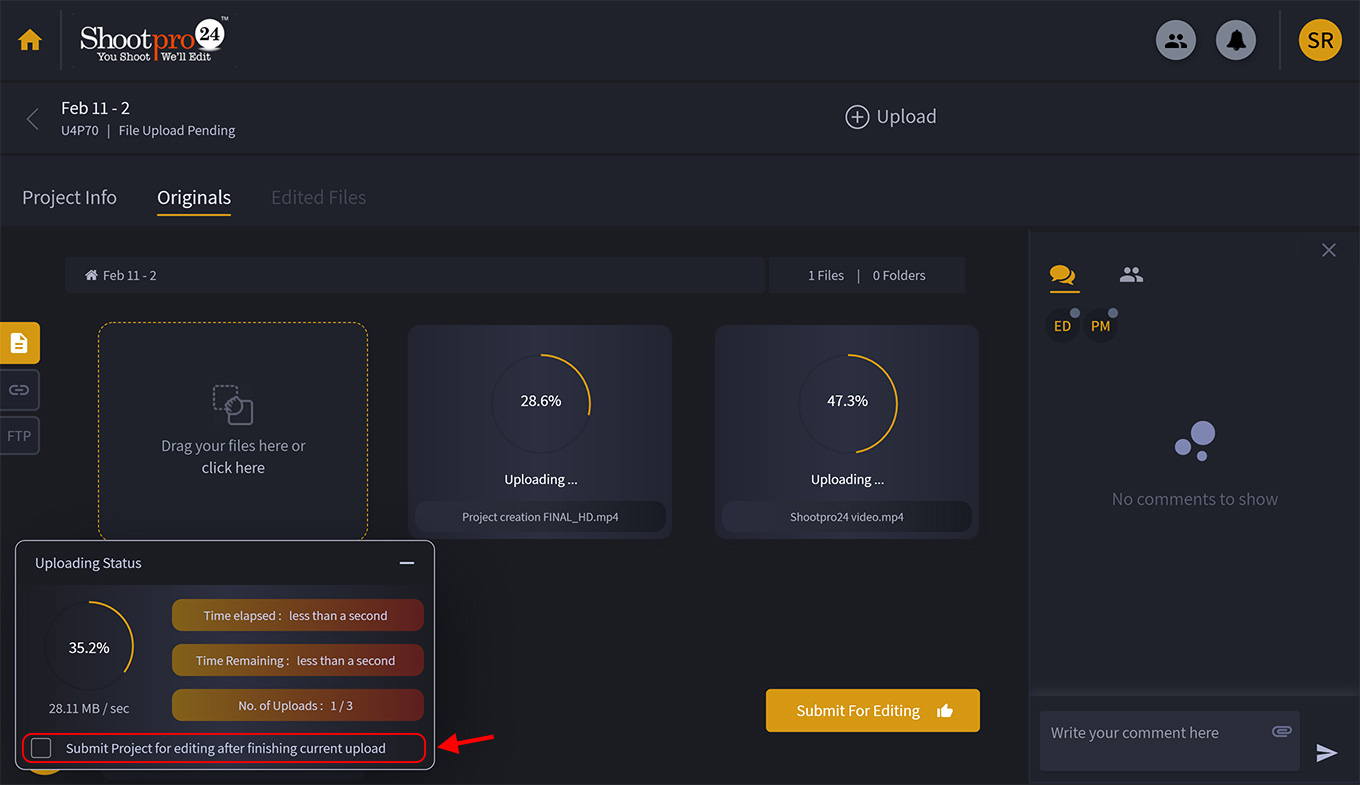
When you start uploading the file there displays a upload status box which contains a checkbox where you can tick "Submit Project for editing after finishing current upload". It will enable your project to automatically submit for editing once the file upload is over.
Our standard processing time is 7-10 business days. Once you submit a project with us it will accepted and assigned for editing. For both Videos and Photos you can watch the progress logging in your page with Shootpro24. Changes and new files needed during the first round can delay the process, of course, but with every project we work to deliver a finished product to you within a reasonable time.
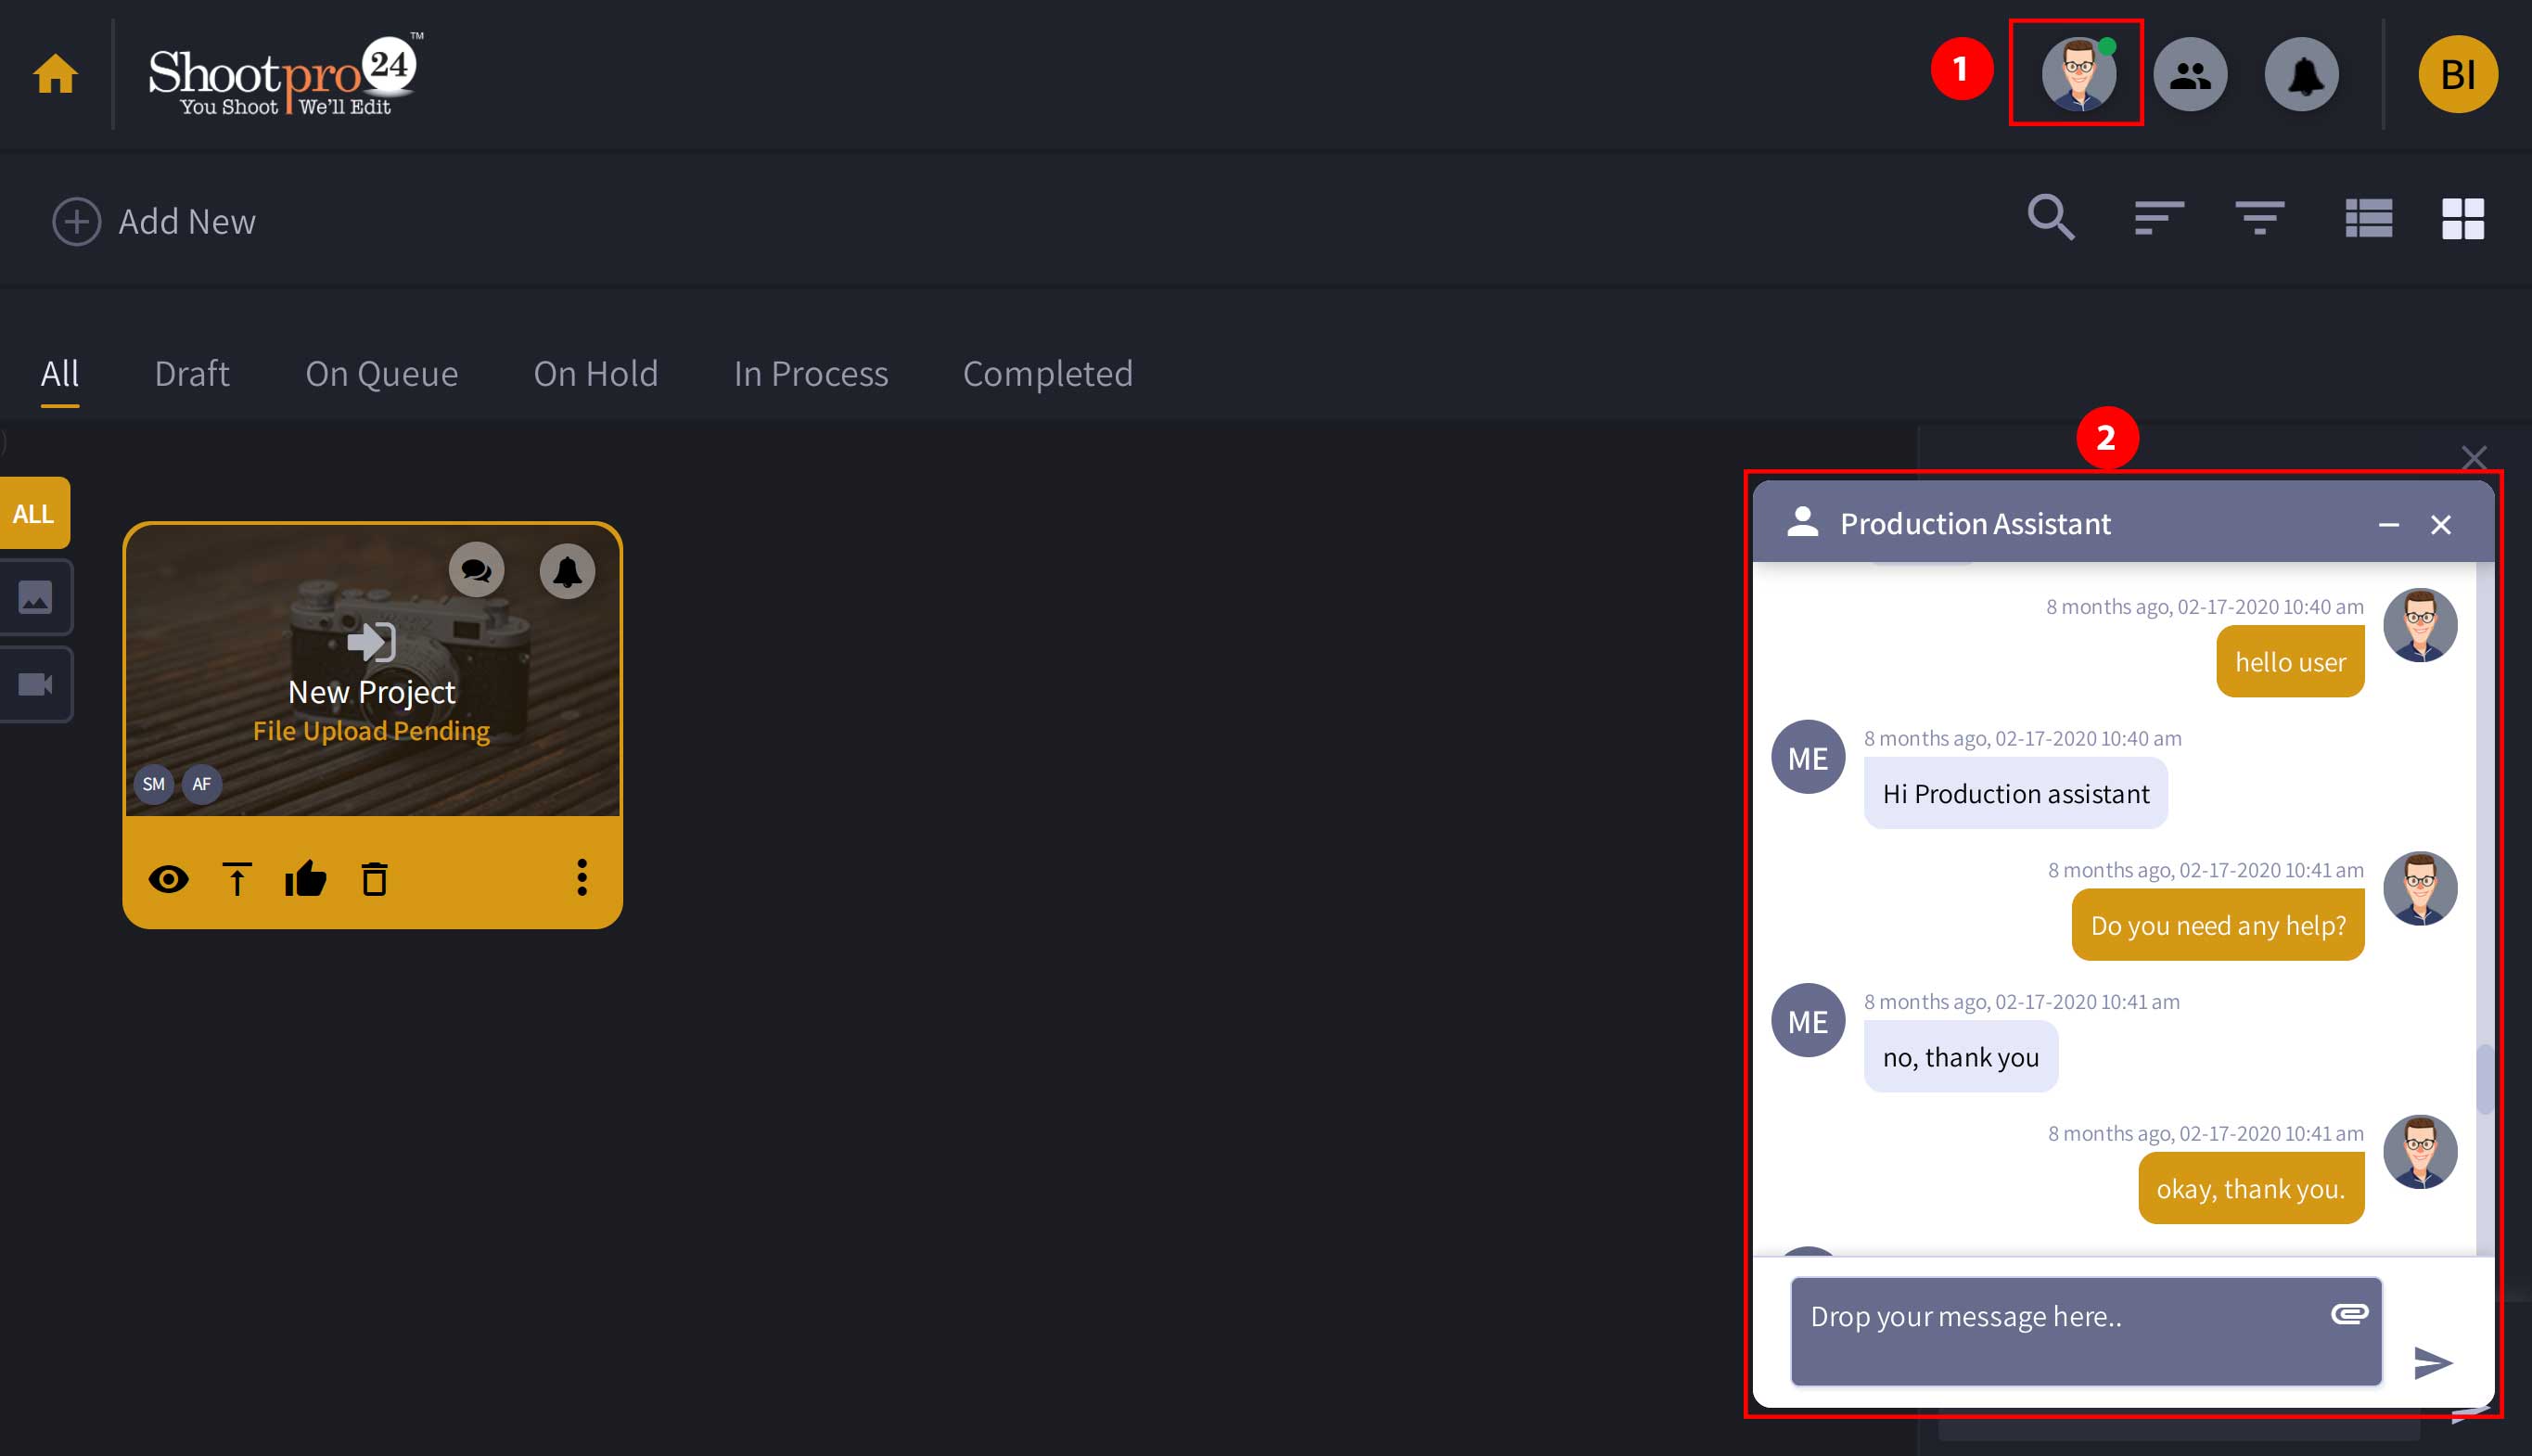
Well, you can communicate with Shootpro24 team in 2 ways. One is through "Direct Chat with Production Assistant"(1) and the other is through submitting a comment in the "comment box" (2).

Our Direct Chat facility will enable you to chat with our Production Assistant. You can communicate with our production Assistant at any time. If the project Assistant is online, our "Production Assistant icon" (1) will show a green dot. If you click the icon, it will open a chatbox (2).
Our commenting section is to enable you to make comments about your project. We have facilitated it to attach (1) documents or files with your comments. To make comments type in the "Write your comment here" area at the bottom of the commenting section.
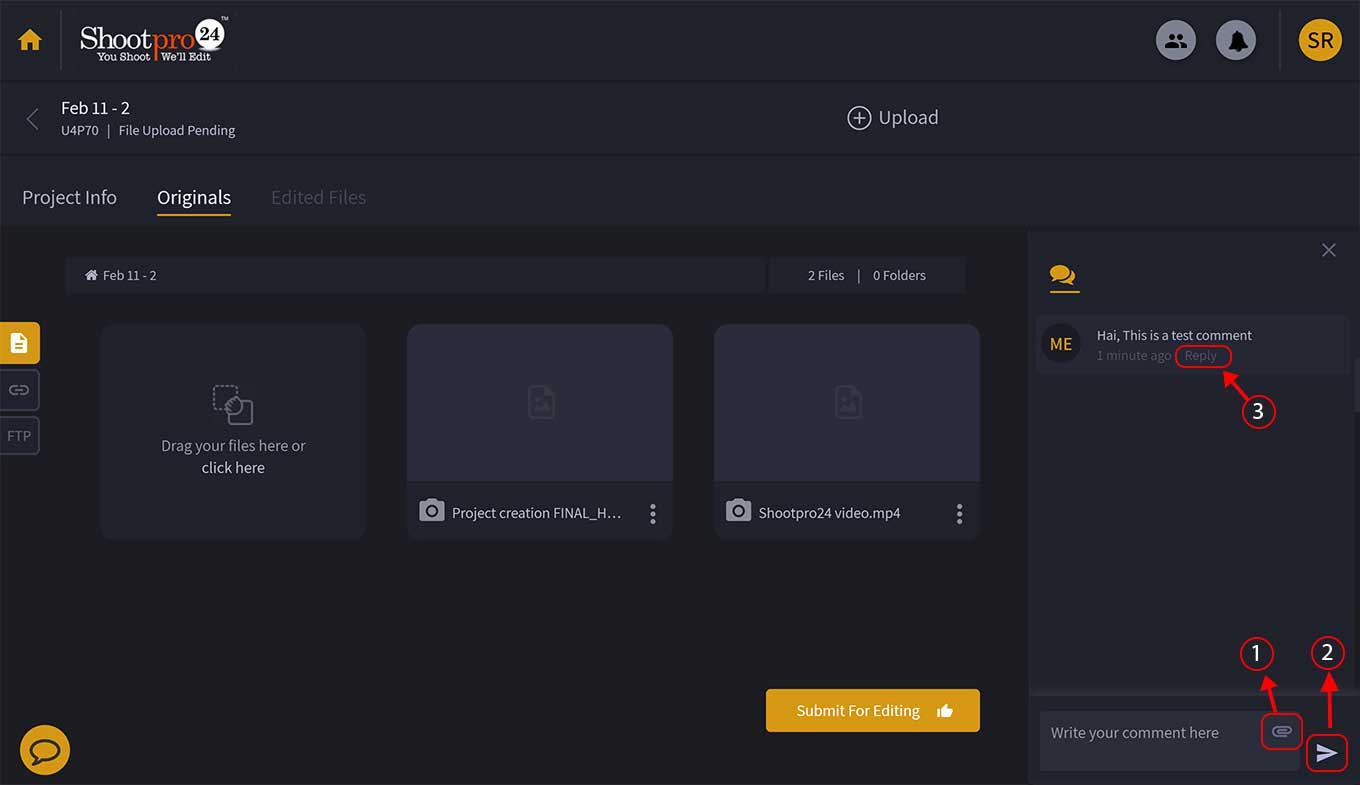
To post the comments type your comment and press "enter" key or click the "sent" (2) icon.
Use "Control + Enter" keys to add a new line.
Click on the "Reply"(3) button on each comment to reply to any comments.
Yes, we do provide alternative options for our customers who have their files with images or videos uploaded on some other servers like Dropbox. In case, you don't want to upload the files again on our server, we provide you the convenience to share the Link (1) details or FTP (2) details with us.
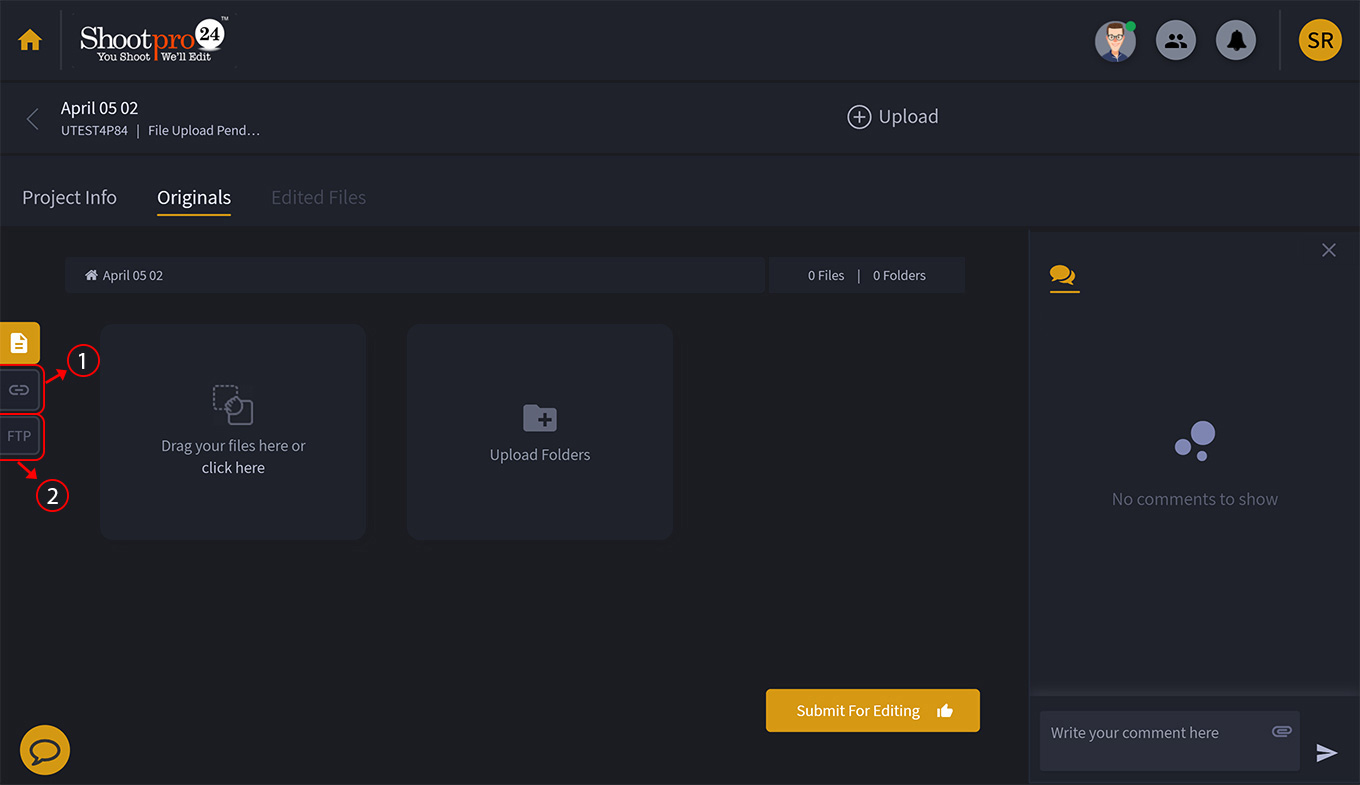
To add the link details, Click the "Link Icon"(1) on the project inner page at the left side.
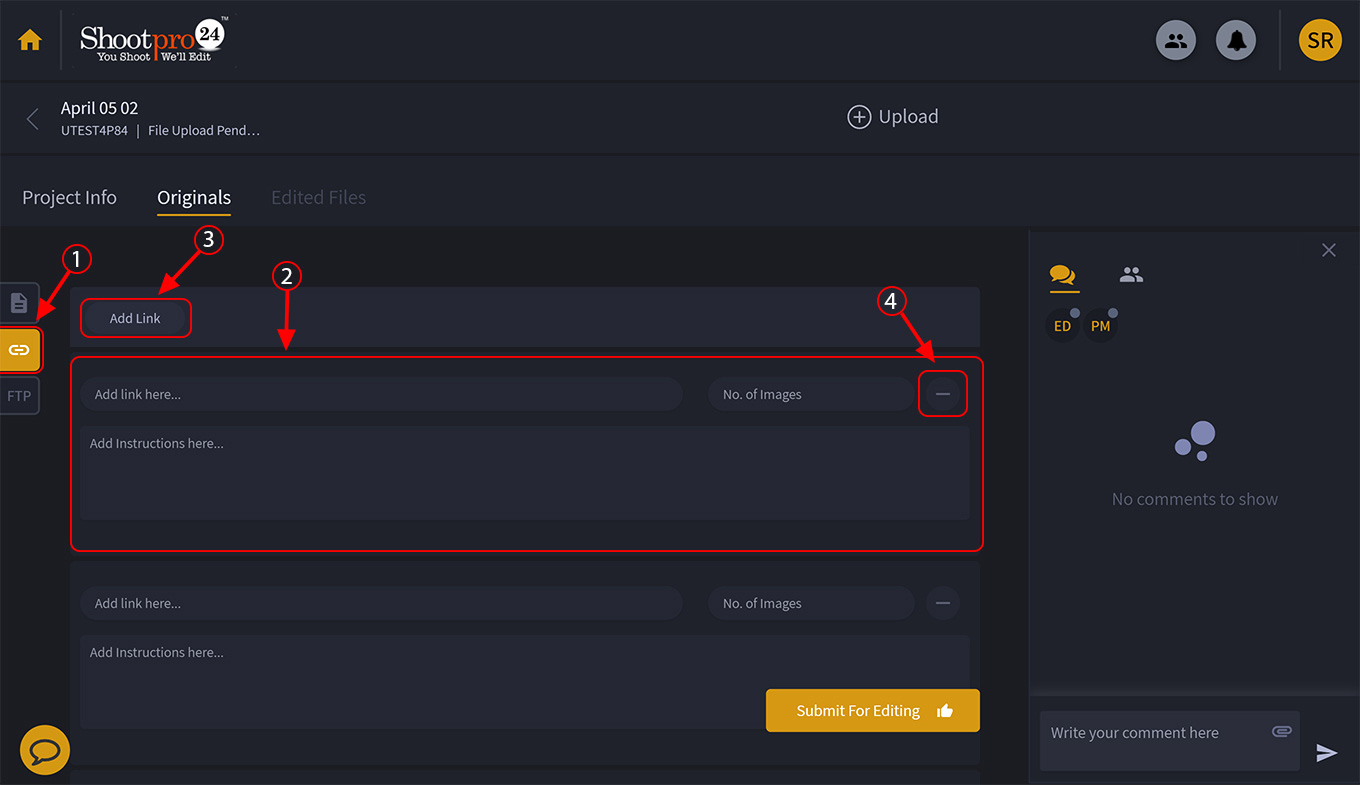
You will be shown a new section (2) where you can add the link, no. of images and the instructions.
In case, if you have multiple links and you want to add all those, Click on "Add new" (3) button at the left side.
Now, you want to remove an added link. What you need to do is click on “Remove” (4) button to remove the link details.
To add the FTP details, Click the FTP button (1) which is at the left side of the project’s inner page. You’ll see a new section to add the FTP Details.

The FTP Details (2) such as:
Host name
User Name
Password
Port Number
Location
Additional Information
Yes, we provide free samples for all our services. You can request for free samples if needed. For specific service such as Standard Color Correction, You can select "Request 5 Free Samples" option while selecting the "Standard Color Correction" service.
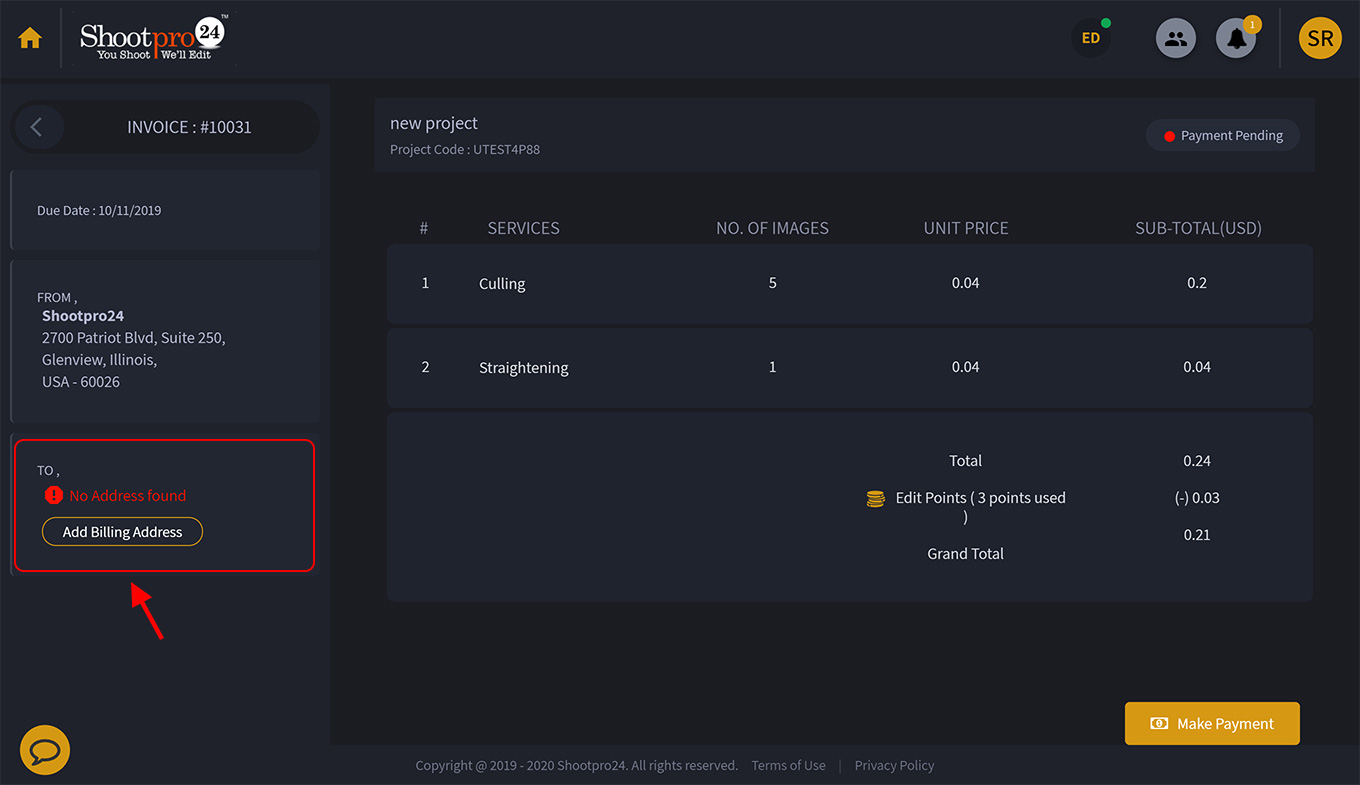
We have made it simple for you make the payments. Each project you create will show some grid boxes. You can see an "Invoice Icon" before the footer section of the project grid box.
Click on that icon to go to "Invoice" Page. Here you can see the generated invoice.
At the left side of the page, you have to add "Billing Address” by clicking on "Add Billing Address" button.
On the billing details page, enter the following details:
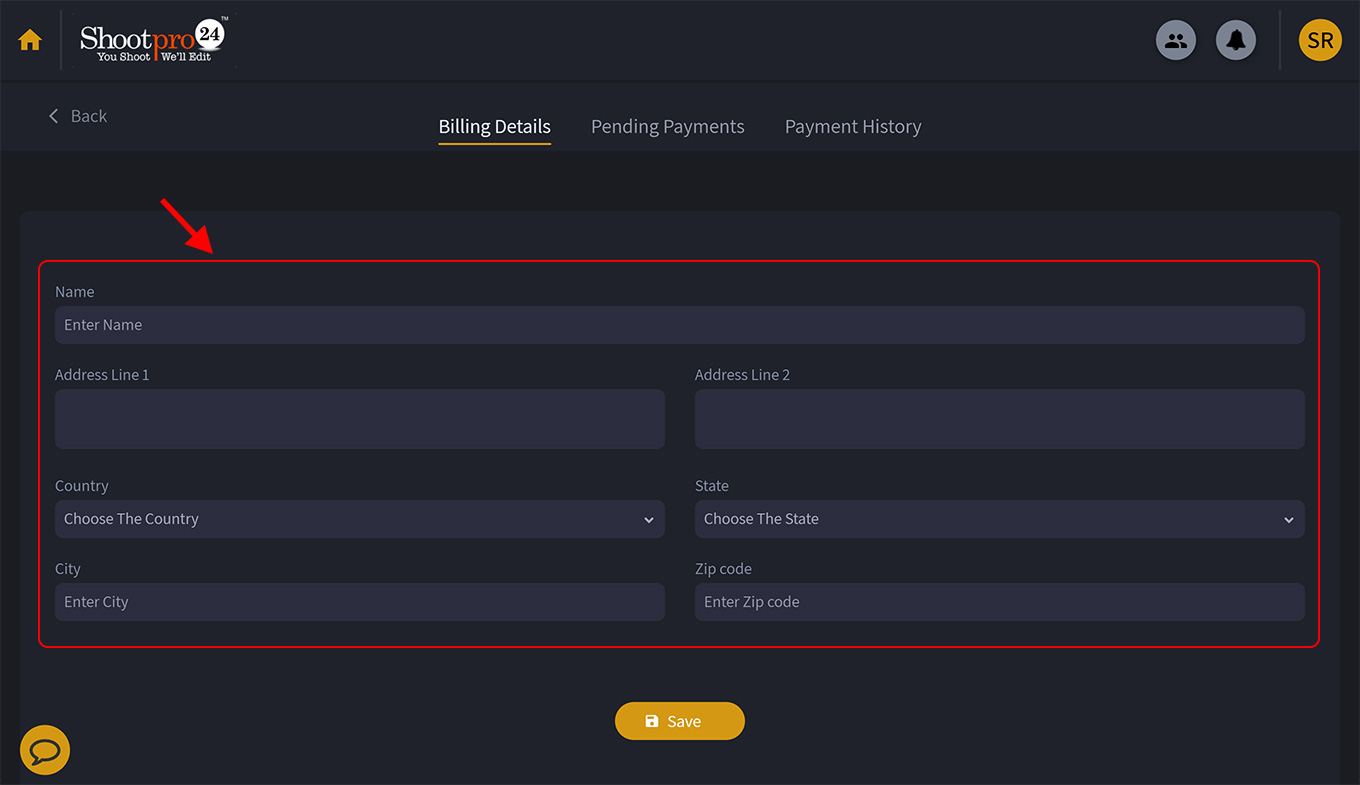
Name
Address Line 1, Address Line 2
Country
State
City
Zip Code
Then click "Save" Button to save the billing details. If you want to return to the invoice page, click "back" button.
To proceed for making payments:
Click the "Make Payment" button at the bottom of the invoice page.
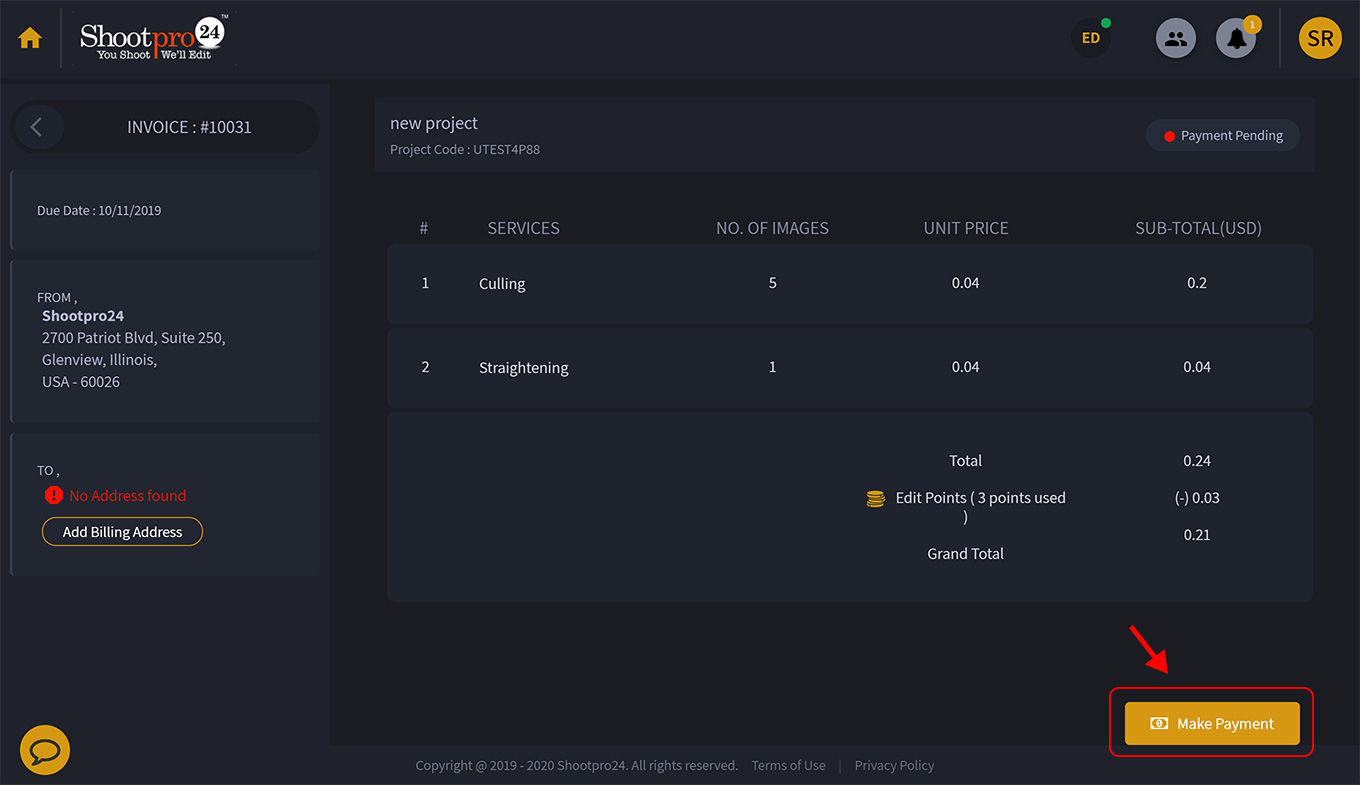
Add necessary details about the card and billing details
Then click "Pay" button to complete the payment.
Note: Once you make the payment, your card is added to the payment option. You can select the "saved card" to make the payment easier.
You can remove the saved card from our application by following these steps.
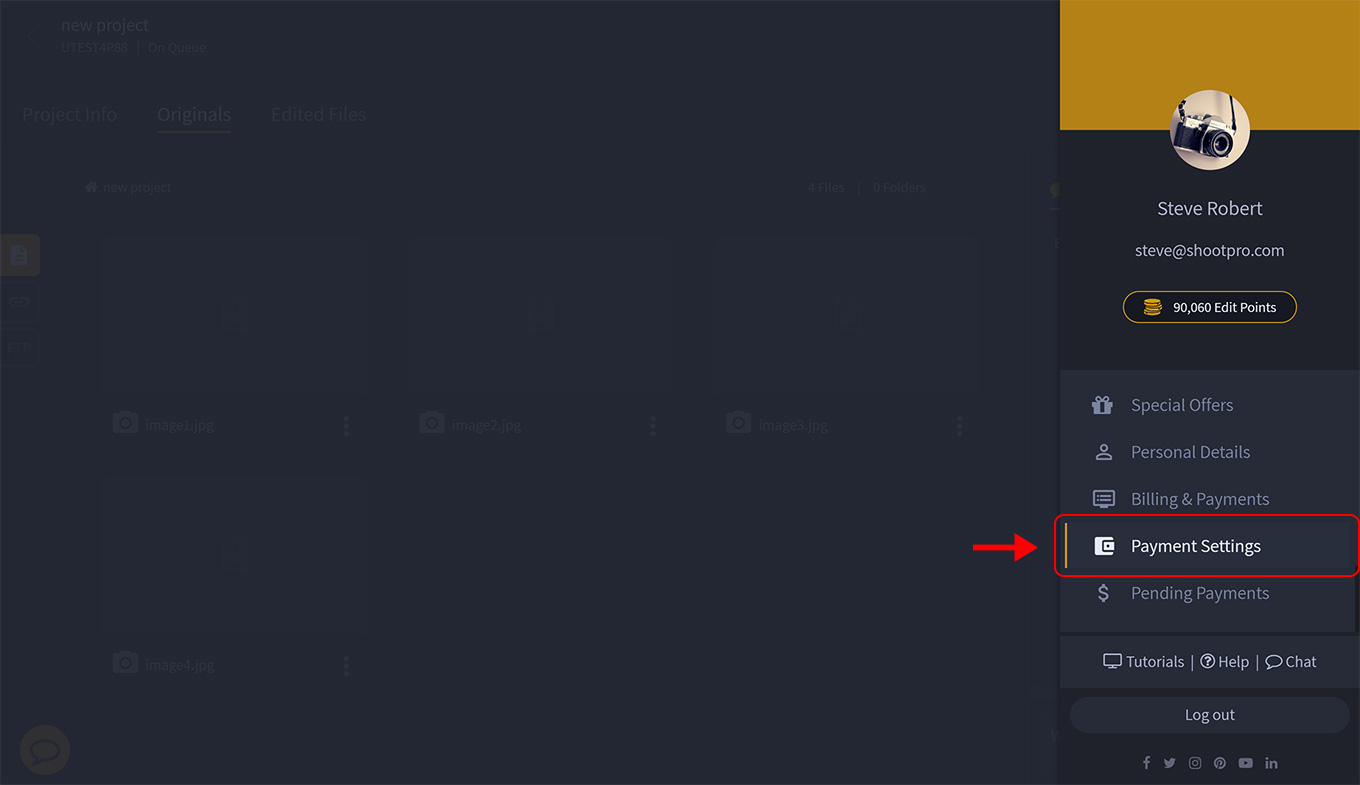
Click "Profile" Icon at the top-right corner of the page.
Select "Payment Settings" option from the opened section at the right side.
Click “Delete" Icon of the available card.
Yes, you can check the payment history. To check the payment history please follow these steps:
Click "Profile" Icon on the top-right corner of the page.
Select "Payment History" option from the opened section.

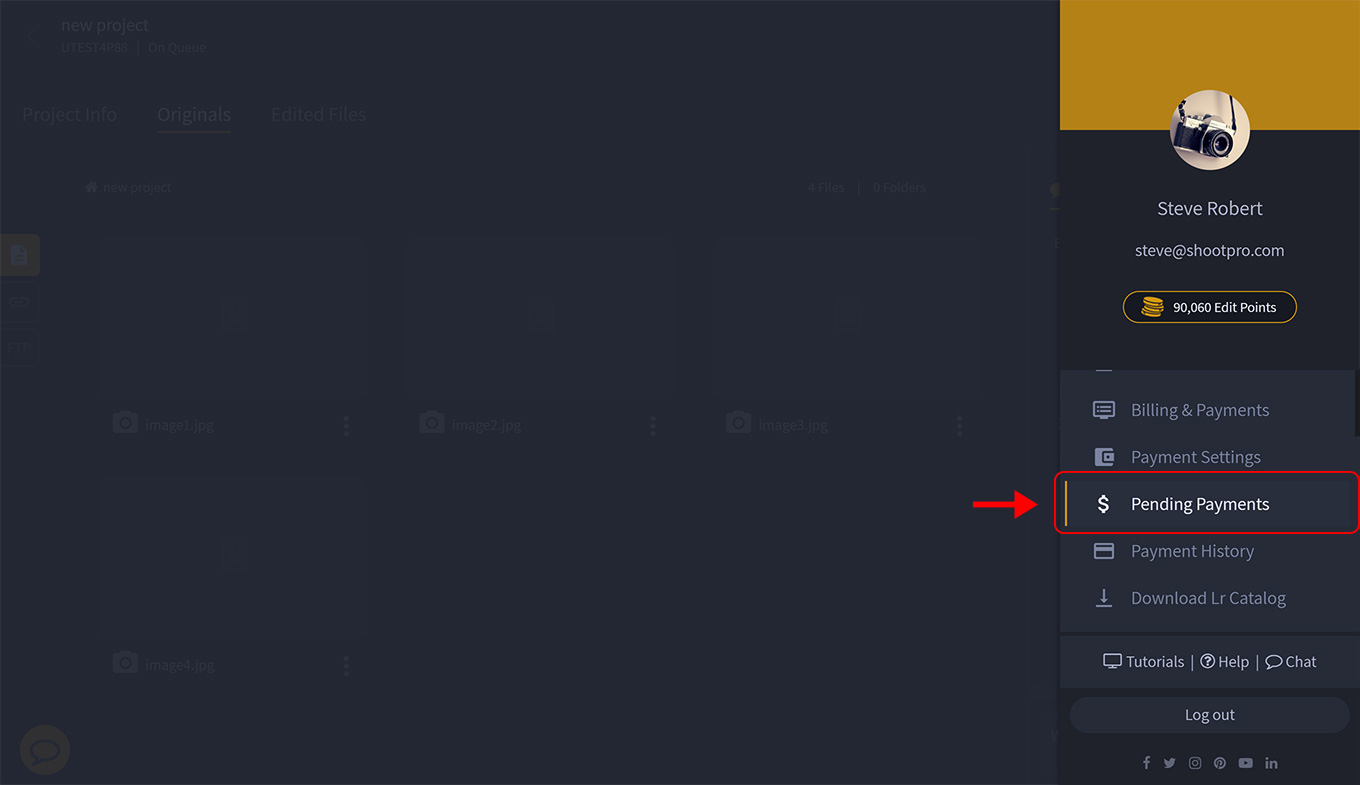
You can pay multiple invoices at a time following the below steps:
Click "Profile" Icon on the top-right corner of the page.
Select "Pending Payment” option from the opened section.
Set the "From Date" (1) and “To Date" (2) .

You can see the list of pending invoices. Each invoices have a "tick mark" (3) at the right hand side.
Select the invoices you want to pay by clicking on the tick mark. If you want to select all invoices from the list, click on the tick mark (4) on the title bar. You can also deselect the boxes by clicking the same icons.
After selecting the invoices click "Proceed to Pay" (5) button.
You may then follow the same steps of payment as mentioned earlier.
Yes, we do provide One Hundred Thousand Edit Points on sign up. You can redeem these edit points at the time of invoice generation.
You will get maximum 15% Discount on every invoice (the 15% discount is equivalent to edit points).
You will get 5% edit points on every invoice.
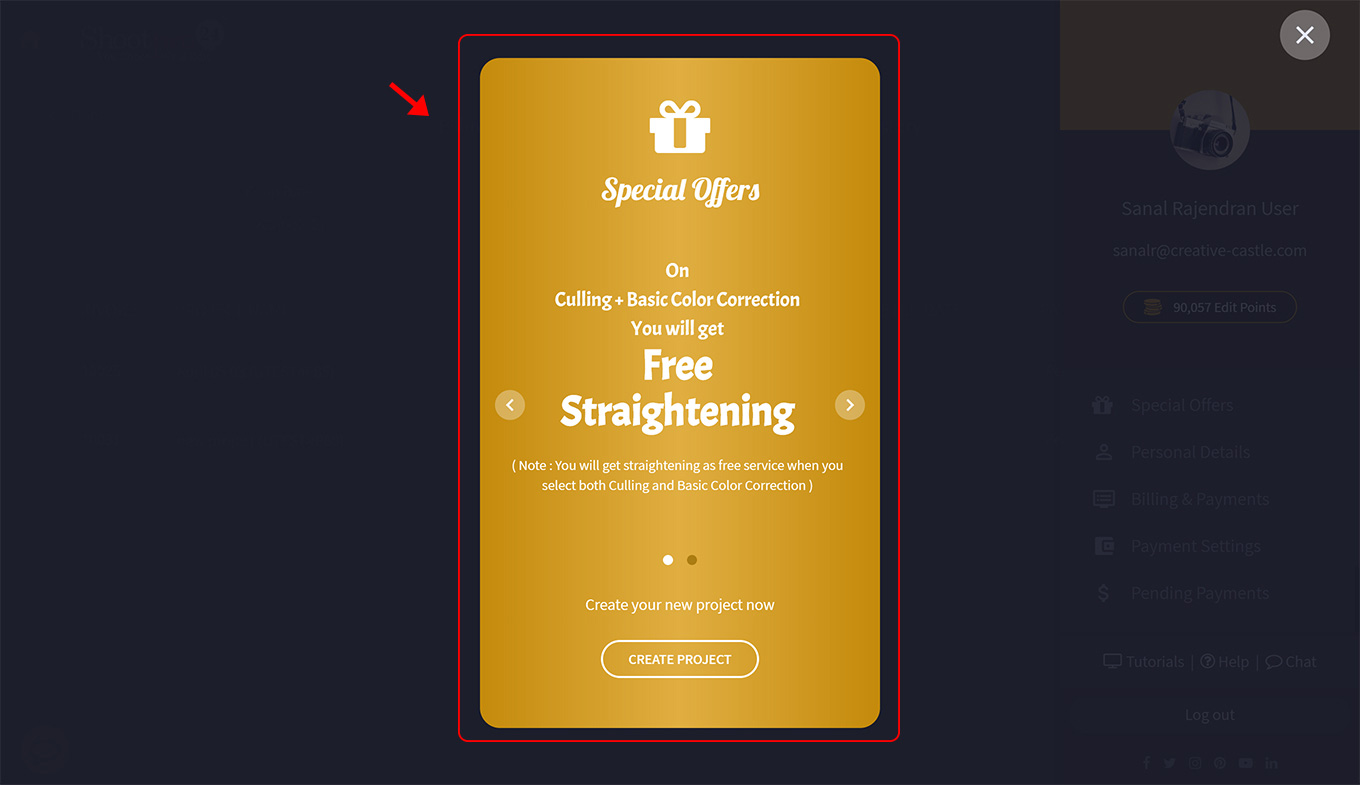
We also provide Special offers. To check special offers:
a) Click "Profile Icon" at the top-right side of the page.
b) Select "Special Offers" from the right-hand section of the menu.
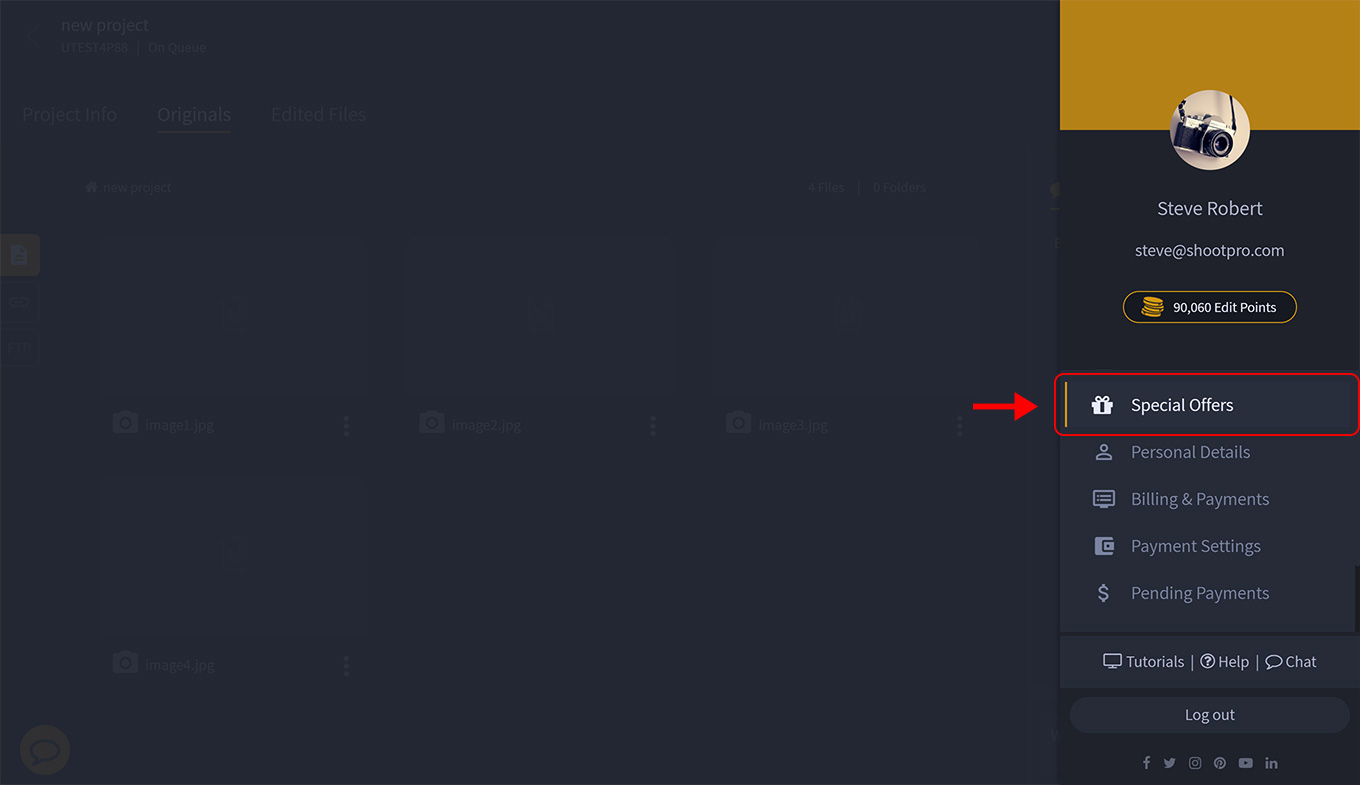
c) A slider will appear containing the specials offers.
Every user will get One Hundred Thousand edit points at the time of registration. Once you get the edit points, you can redeem these points at the time of payment.
One Hundred Thousand edit points is equal to 0.01 USD (1 cent).
We offer 15% discount for every Invoices if you have these edit points. It will be automatically redeemed at the time of invoice generation. The used edit points will be deducted from the total edit points you earn.
To check the available edit points:
Click the "Profile Icon".
A new section is opened at the right-hand side. You can see the available "edit points" here.

We offer 5% of the Edit points on every invoice. This edit points will be automatically added with the available edit points.
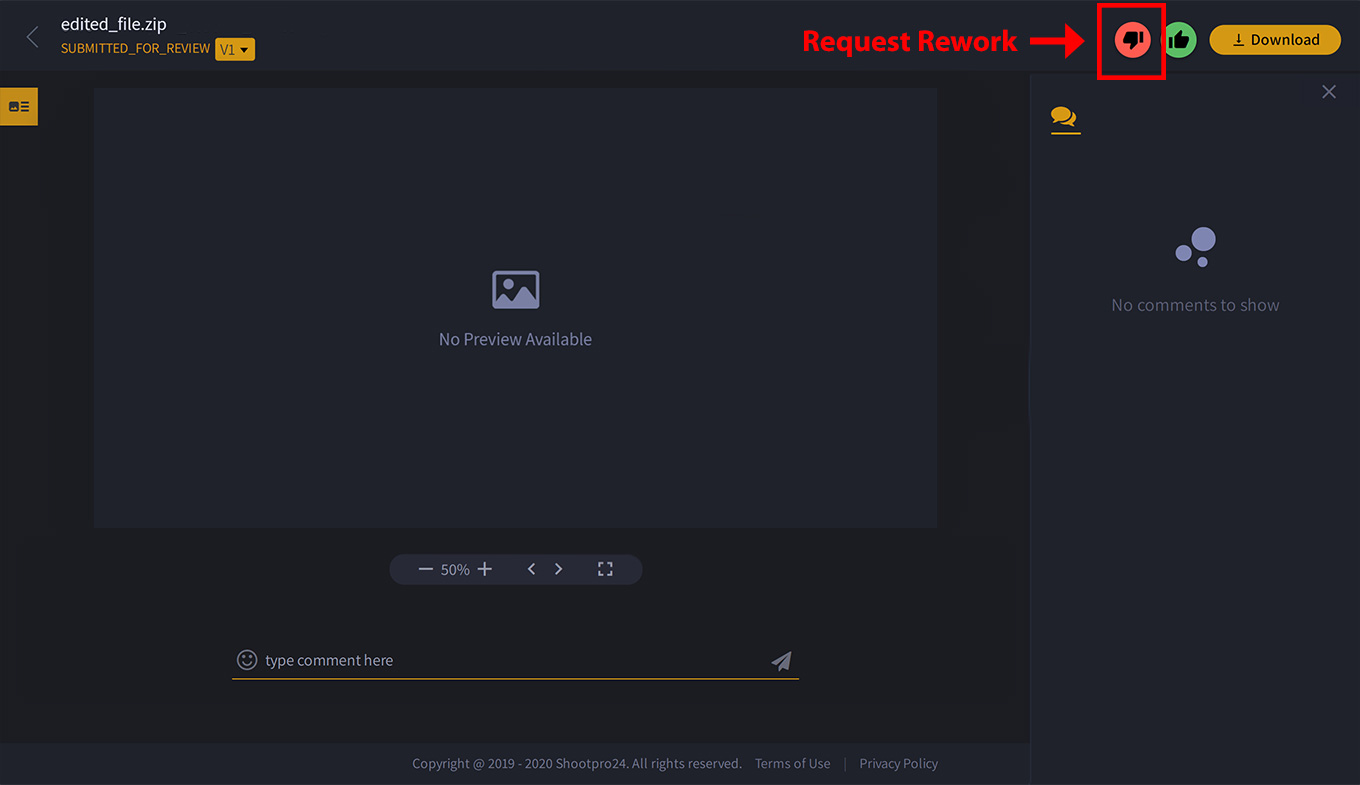
If you are not satisfied with our editing service, you can request for "Rework". You can provide more detailed instructions and samples for understanding your style.
To request for rework:
Click on the "Edited files" (1).
Then Click "Eye Icon" (2) on the file you want to re-work.
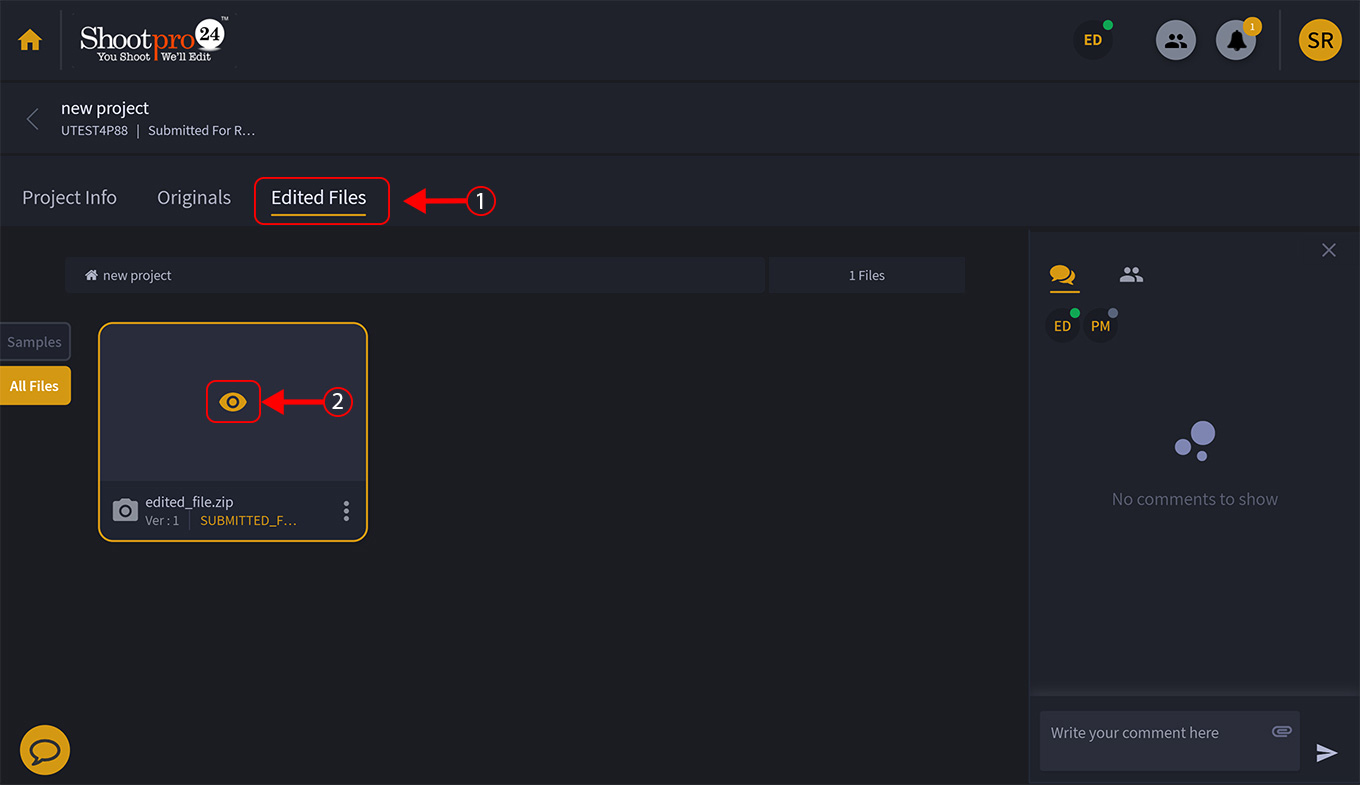
The file preview page will appear. Click the "Request Rework" button.
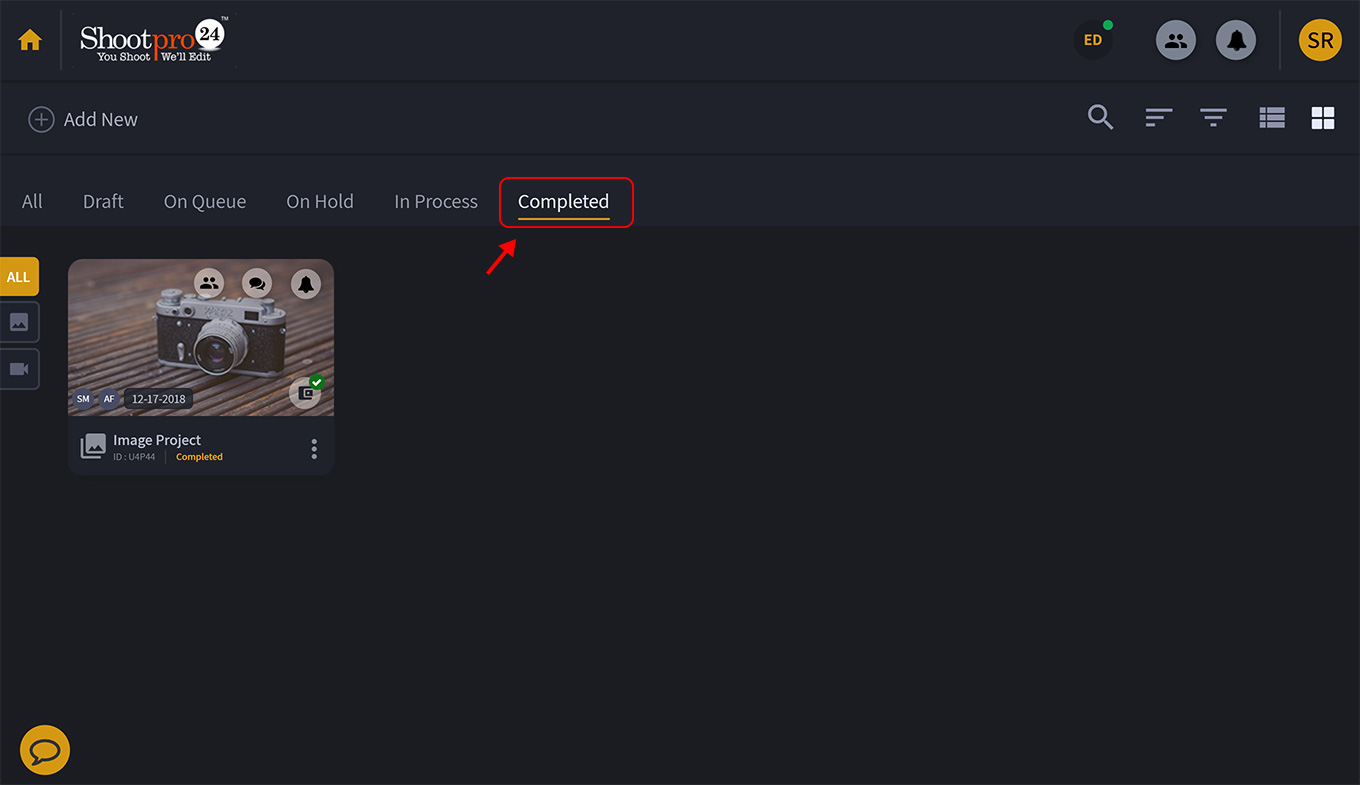
We keep your project for a maximum of 45 days. These completed projects are kept under the "Completed" section. You can see the completed project by clicking "Completed" tab on the second menu bar from the home page.
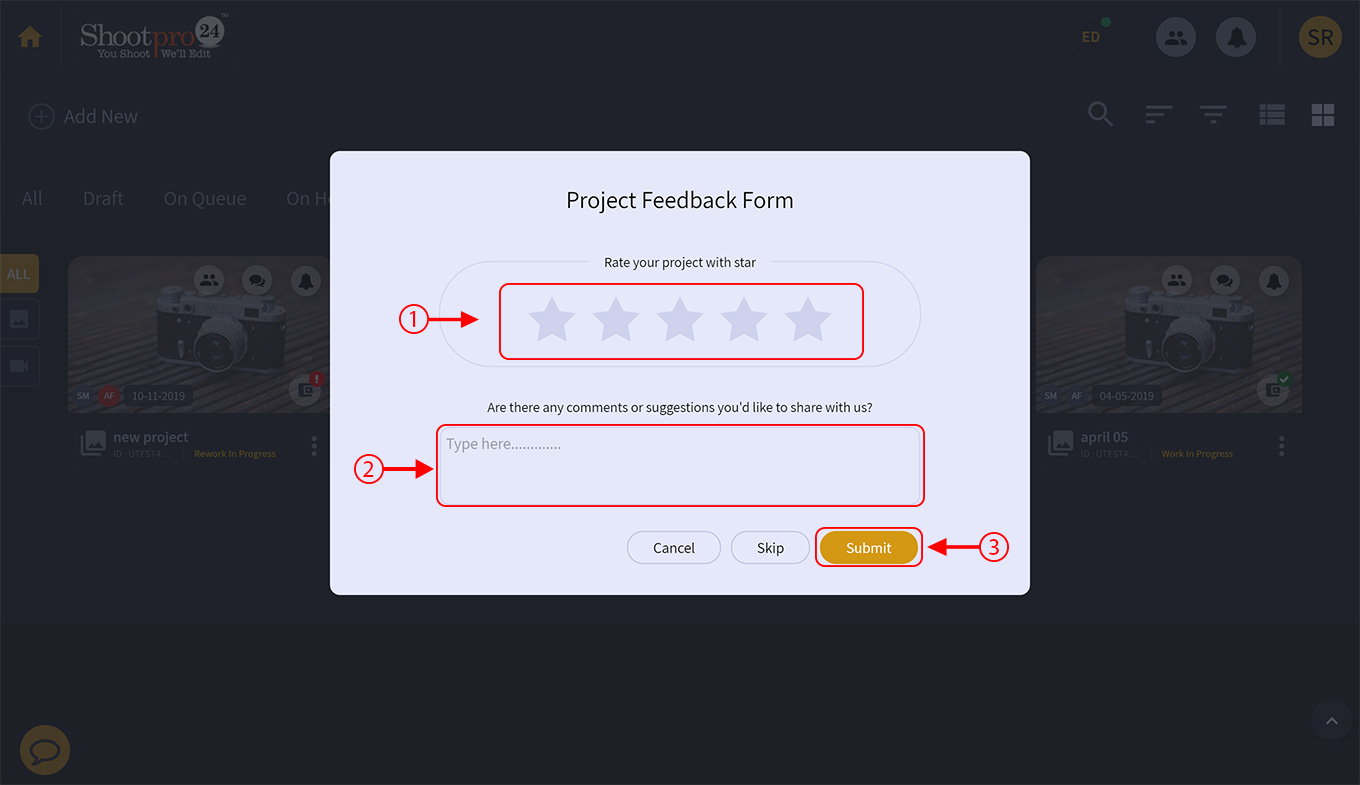
Your feedbacks are really valuable to us.To express your opinions on our services, you’ve to mark the project as complete by putting a tick mark on the project grid box.
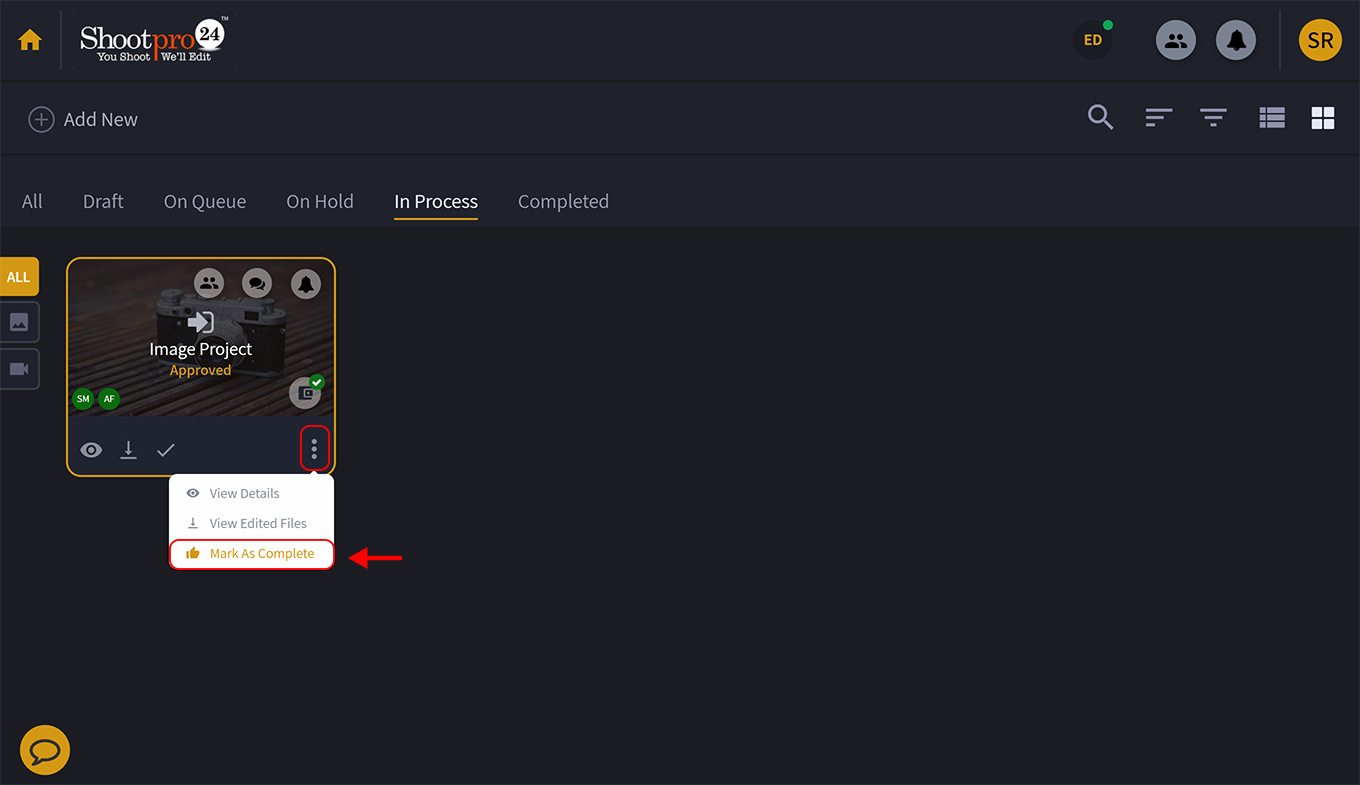
When your project is completed, a feedback form will be appeared.There are "star ratings" (1) as well. You may choose to give the stars out of 5 according to the level of your satisfaction. You can also mention a detailed "feedback" (2) of the project at the bottom of the page and then click "Submit" (3) to share the feedback with us.
No. We accept events, parties and projects of different types. But, Shootpro24 specialize in Weddings – that’s why we are so good and affordable.
Shootpro24 can be as creative as needed to suit your needs. We understand everyone has a unique style of editing. Once we start working together you will complete a project file where you can include detailed instructions and upload links or files of your works.
Probably not! The quality of the final video(s) depends lot on the quality of the footage submitted. There may be times when the files sent to us are already corrupted or damaged, and we will have to decline the editing. Since we want to work with you, please reach out and see if we can work on your request. Our team is quite capable.
We stand behind the quality of our work 100% - but also understand you have exacting standards as well. Yes, in limited quantity and for short viewing minutes, we can process a sample. Please be aware that turn around during the high season may not be immediate.
Of course! Many of our clients are full-service videography or production companies and Shootpro24 works for them to handle certain aspects of their work..We are happy to take on project work as well as maintain a discreet relationship between us as you share the final work, (If you want.) With both photo and video editing we are here to save you time and money.